Welcome to Free PC Helpdesk

Computer Helpdesk for free.

Welcome!

Having problems with your Win XP/7/10? Then this Blog is right for you! Just follow below instructions.

My suggestion is to print the text first so you can easily do the steps.

Enjoy!

Please note, that this Blog does not take any responsibility if something worst happened to your computer. Please follow the steps carefully at your own risk.


Wednesday, July 17, 2024

Tech Support Scam Spreads to Hong Kong, 20 Residents Affected

Tech Support Scam Spreads to Hong Kong, 20 Residents Affected

Recently, a tech support scam that was widespread in Singapore has made its way to Hong Kong, leaving 20 residents as victims. One individual even lost a staggering HK$1 million to the scam, shedding light on the growing issue of online fraud in the region.

How the Scam Works

The tech support scam typically involves scammers posing as tech support agents from reputable companies such as Microsoft or Apple. They use various tactics to gain the victim's trust, such as claiming there is a virus on their computer that needs to be removed immediately.

  • Victims are then directed to download software that gives the scammers remote access to their computer.
  • The scammers may ask for payment for their services, claiming it is needed to fix the supposed issue.
  • In some cases, the scammers install ransomware on the victim's computer, locking them out until they pay a hefty fee.

The Impact on Victims

For the victims of this tech support scam in Hong Kong, the consequences can be devastating. The loss of HK$1 million by one individual shows just how much damage these scammers can cause, both financially and emotionally.

Many victims may feel embarrassed or ashamed after falling for the scam, leading them to keep the incident a secret. However, it is crucial for victims to report the fraud to the police and take steps to protect themselves from further scams.

Preventing Tech Support Scams

There are several steps individuals can take to protect themselves from falling victim to tech support scams:

  • Be cautious: If a tech support agent contacts you out of the blue, be wary. Legitimate companies typically do not reach out to customers in this way.
  • Verify the caller: Ask for the caller's credentials and verify their identity before giving them any information.
  • Avoid remote access: Be cautious about giving remote access to your computer to anyone you do not know or trust.
  • Stay informed: Keep up-to-date on the latest scams and fraud tactics to better protect yourself.

Final Thoughts

As the tech support scam spreads to Hong Kong, it is essential for residents to remain vigilant and protect themselves from falling victim to this type of fraud. By staying informed and following the steps outlined above, individuals can reduce their risk of being targeted by scammers.

If you or someone you know has been a victim of the tech support scam, do not hesitate to report the incident to the authorities. Together, we can work towards combating online fraud and keeping our community safe.

Monday, July 15, 2024

Innovative IT Solutions at Texas Woman's University

Innovative IT Solutions at Texas Woman's University

Technology plays a crucial role in higher education, enhancing the learning experience and streamlining administrative processes. Texas Woman's University (TWU) is at the forefront of utilizing innovative IT solutions to enhance the educational experience for its students, faculty, and staff.

Latest Technological Initiatives

TWU is dedicated to staying up-to-date with the latest technological advancements to ensure a seamless and efficient learning environment. The university recently implemented several key initiatives to enhance its IT infrastructure:

  • Virtual Desktop Infrastructure: TWU launched a virtual desktop infrastructure (VDI) that allows students and faculty to access software and resources remotely from any device. This initiative has greatly improved accessibility and flexibility for the TWU community.
  • Collaboration Tools: TWU implemented new collaboration tools such as Microsoft Teams and Zoom to facilitate online meetings, group projects, and virtual lectures. These tools have been instrumental in promoting communication and teamwork among students and faculty.
  • Data Analytics: TWU has invested in data analytics tools to analyze student performance, track trends, and improve academic outcomes. These tools provide valuable insights that help the university make data-driven decisions to enhance the quality of education.

Ensuring Cybersecurity

With the increasing reliance on technology, cybersecurity has become a top priority for TWU. The university has implemented robust cybersecurity measures to protect sensitive information and safeguard its digital assets. TWU's IT team regularly conducts security assessments, updates software patches, and provides cybersecurity training to the TWU community to prevent data breaches and cyberattacks.

Supporting Distance Learning

As the demand for online education continues to grow, TWU has ramped up its efforts to support distance learning initiatives. The university offers a variety of online programs and courses that are designed to provide a high-quality education to students regardless of their location. TWU's IT team provides technical support, training, and resources to ensure that students and faculty have a seamless online learning experience.

Future Technological Developments

Looking ahead, TWU is committed to exploring new technological developments that can further enhance the educational experience for its community. The university is actively researching emerging technologies such as artificial intelligence, virtual reality, and blockchain to determine how these innovations can be leveraged to improve teaching, learning, and research at TWU.

With a proactive approach to technology adoption and a commitment to innovation, Texas Woman's University is paving the way for a future where technology plays a central role in higher education.

Stay tuned for more updates on TWU's IT initiatives!

Friday, July 12, 2024

Ohio University IT Help Desk Relocates to Alden Library's Fourth Floor

Exciting News for Ohio University Students!

Ohio University's IT Help Desk is on the move! The much-needed IT support center is relocating to a new and improved location on the fourth floor of Alden Library. This move is part of the university's ongoing efforts to enhance the student experience and provide better access to technology services.

What does this mean for students?

This relocation is great news for students who rely on the IT Help Desk for assistance with their technology needs. The new location in Alden Library's fourth floor will make it even more convenient for students to get the help they need. With extended hours and a central campus location, students can easily access the help desk services between classes or during study sessions.

Benefits of the new location

Here are some of the benefits that students can expect from the IT Help Desk's new location:

  • Convenient access on the fourth floor of Alden Library
  • Extended hours for additional support
  • Improved services and resources for students

By moving to Alden Library, the IT Help Desk will be more accessible to students who spend a lot of time on campus. The central location will make it easier for students to get assistance with technology issues, whether it's troubleshooting software problems or getting help with setting up their devices.

Enhancing the student experience

The relocation of the IT Help Desk is part of Ohio University's commitment to enhancing the student experience and providing top-notch services to its students. By moving to a more convenient location, the university is making it easier for students to access the technology resources they need to succeed in their academic endeavors.

With the IT Help Desk now located on the fourth floor of Alden Library, students can take advantage of the support services offered by knowledgeable staff members. Whether they need help with connecting to the campus Wi-Fi network or troubleshooting a tech issue, students can rely on the IT Help Desk to provide the assistance they need.

Final thoughts

Overall, the relocation of Ohio University's IT Help Desk to Alden Library's fourth floor is a positive development for students. The move will make it easier for students to access the support services they need to succeed in their academic pursuits. With extended hours and improved resources, the IT Help Desk is well-equipped to assist students with their technology needs.

So next time you find yourself in need of tech support, head over to Alden Library's fourth floor and take advantage of the services offered by the IT Help Desk. Your technology issues will be resolved in no time, thanks to the knowledgeable staff members ready to assist you.

Stay tuned for more updates on Ohio University's efforts to enhance the student experience and provide top-notch services to its students!

Enterprises advised to consider Windows 10 support options carefully

Enterprises advised to consider Windows 10 support options carefully

The importance of Windows 10 extended support

As the deadline for the end of Windows 7 support looms, many enterprises are now turning their attention to Windows 10. However, with the various extended support options available for Windows 10, it is crucial for businesses to carefully consider their options before making a decision.

Why is extended support important?

Extended support for an operating system is essential for businesses to ensure that their systems are secure and functioning properly. Without extended support, businesses may be vulnerable to security threats and may face compatibility issues with new software and hardware.

Here are some key factors for enterprises to consider when evaluating their Windows 10 extended support options:

  • Microsoft's Extended Security Updates (ESU): Microsoft offers Extended Security Updates for Windows 10 Enterprise and Education editions for an additional fee. This option provides security updates for up to three years after the end of mainstream support.
  • Windows 7 Extended Security Updates: For businesses still running Windows 7, Microsoft offers Extended Security Updates as a temporary solution until they can upgrade to Windows 10.
  • Windows 10 Long-Term Servicing Channel (LTSC): The LTSC is designed for specialized systems that require minimal changes and have long-term stability requirements. This option provides support for up to 10 years after the release date.

Factors to consider when choosing a support option

When choosing a Windows 10 extended support option, businesses should consider factors such as their budget, IT infrastructure, and specific business needs. It is important for businesses to assess their current systems and determine which support option aligns best with their long-term goals.

Here are some key considerations for enterprises:

  • Cost: Businesses need to factor in the cost of each support option and determine which option best fits their budget.
  • Compatibility: Businesses should ensure that the support option they choose is compatible with their existing software and hardware.
  • Long-term strategy: Businesses should consider their long-term IT strategy and choose a support option that aligns with their future goals.

Conclusion

As businesses transition to Windows 10, it is crucial for them to carefully evaluate their extended support options to ensure that their systems remain secure and efficient. By considering factors such as cost, compatibility, and long-term strategy, enterprises can make an informed decision that will benefit their organization in the long run.

Saturday, January 27, 2024

How to Download YouTube Videos

Downloading YouTube videos for offline viewing is a great way to save data and watch your favorite videos without an internet connection. There are many ways to download YouTube videos, and this article will discuss some of the most popular methods.

1. YouTube Premium

  • Features: Download videos for offline viewing in various qualities, including HD.
  • Advantages: Ad-free viewing, background play, and other exclusive features.
  • Disadvantages: Requires a monthly subscription fee.

2. Website Downloaders

  • Examples: Savefrom.net, Y2mate.com, YTMP3.cc, and others.
  • Steps:
    • Copy the link of the YouTube video you want to download.
    • Paste the link into the URL bar of the downloader website.
    • Select the desired format and quality of the video.
    • Click the "Download" button and wait for the process to finish.
  • Advantages: Free, easy to use, and no need to install an app.
  • Disadvantages: Risk of malware, intrusive ads, and video quality not guaranteed.

3. Browser Extensions

  • Examples: Video DownloadHelper (Firefox), SaveFrom.net Helper (Chrome), and others.
  • Steps:
    • Install the browser extension of your choice.
    • Open the YouTube video you want to download.
    • Click the extension icon.
    • Select the desired format and quality of the video.
    • Click the "Download" button and wait for the process to finish.
  • Advantages: Easy to use, integrated with the browser, and quick access.
  • Disadvantages: Extension availability depends on the browser, and risk of malware on third-party extensions.

4. Downloader Apps

  • Examples: Videoder (Android), TubeMate (Android), Documents by Readdle (iOS), and others.
  • Steps:
    • Install the downloader app of your choice.
    • Open the app and search for the YouTube video you want to download.
    • Copy the video link or paste it into the app.
    • Select the desired format and quality of the video.
    • Click the "Download" button and wait for the process to finish.
  • Advantages: Feature-rich, diverse video format options, and multi-video download.
  • Disadvantages: Risk of malware on third-party apps, and not available on all platforms.

Tips:

  • Make sure you have a stable internet connection to avoid interrupted downloads.
  • Choose the video format that suits your needs.
  • Use antivirus software to protect your device from malware.
  • Be aware of the copyright of the videos you are downloading.

Conclusion:

Downloading YouTube videos can be done in various ways. Choose the method that best suits your needs and preferences. Always remember to follow the tips above for your safety and convenience.

Here are some additional tips for downloading YouTube videos:

  • Use a private or incognito window in your browser to avoid tracking.
  • Download videos only from trusted sources.
  • Be careful of websites and apps that ask for personal information.
  • Only download videos that you are legally allowed to download.

I hope this article was helpful!

Sunday, April 9, 2023

How to Connect A Laptop to a HP Smart Tank 515 printer via WiFi

Here are some steps you can try to resolve the issue of connecting your laptop to the HP Smart Tank 515 printer via WiFi:

  1. Restart Devices: Sometimes a simple restart can resolve the issue. Turn off the laptop and the printer, wait for a few seconds, and then turn them back on.
  2. Check Network Connection: Check to ensure that both the laptop and the printer are connected to the same WiFi network. If they are not, connect both devices to the same network.
  3. Verify Printer Status: Verify that the printer is turned on and that it is ready to receive print jobs. Check the printer's display panel for any error messages or connectivity issues.
  4. Update Printer Firmware: Make sure that your HP Smart Tank 515 printer is running the latest firmware. You can check and update the printer firmware using the HP Smart app or from the printer's control panel.
  5. Update Network Adapter Driver: Update the network adapter driver on your laptop. Go to "Device Manager," find the network adapter, right-click, and select "Update driver."
  6. Reinstall Printer Drivers: Reinstall the printer drivers on your laptop. Uninstall the existing printer drivers and then reinstall them from the HP website or the installation CD that came with the printer.
  7. Disable Firewall: Temporarily disable your laptop's firewall and then try connecting to the printer again.


If these steps don't resolve the issue, you may need to contact HP support for further assistance.


Regenerate

Thursday, February 23, 2023

Problems Printing with Your HP DeskJet Plus 4155 All-in-One

If you are experiencing problems printing with your HP DeskJet Plus 4155 all-in-one printer on Windows 10, you can try the following troubleshooting steps:

  1. Check the printer connections: Make sure that your printer is properly connected to your computer via USB cable or Wi-Fi. If you are using Wi-Fi, ensure that your printer is connected to the same network as your computer.
  2. Restart your printer and computer: Sometimes, restarting your printer and computer can resolve common printing issues. Turn off both devices and wait for a few seconds before turning them back on.
  3. Update or reinstall printer drivers: Outdated or corrupted printer drivers can cause printing problems. You can try updating or reinstalling the printer drivers by going to the HP support website and downloading the latest drivers for your printer model.
  4. Clear print queue: Sometimes, print jobs can get stuck in the print queue and cause issues. You can try clearing the print queue by going to Devices and Printers in the Control Panel, right-clicking on your printer, and selecting See what's printing > Cancel all documents.
  5. Run printer troubleshooter: Windows 10 has a built-in printer troubleshooter that can help diagnose and resolve common printing issues. You can access the troubleshooter by going to Settings (press Win + I on the keyboard) > Update & Security > Troubleshoot > Printer > Run the troubleshooter.

If none of the above steps resolve your printing issues, you may need to contact HP support for further assistance.

Monday, February 20, 2023

How to Set up a Default Printer in Windows 11

 To set up a default printer in Windows 11, you can follow these steps:

  1. Open the Windows 11 Settings app by clicking on the Start menu and selecting the gear icon in the left-hand side of the menu. Alternatively, you can press the Windows key + I on your keyboard.
  2. In the Settings app, click on the "Devices" option.
  3. Click on the "Printers & scanners" option on the left-hand side of the screen.
  4. If your printer is already listed, select it and click on the "Set as default" button.
  5. If your printer is not listed, click on the "Add a printer or scanner" button and follow the prompts to add your printer. Windows 11 will searching for your printer or scanner, it will come up with a list of detected devices that you can choose which one, depends on your device brand and type.
  6. Once your printer is listed and selected, click on the "Manage" button and click in the "Set as default" button to make it your default printer.

After completing these steps, your default printer will be set up in Windows 11. Anytime you print a document or file, it will automatically be sent to your default printer.


Possible Problems when Connecting Xbox Your Screen

There are several possible reasons why your Xbox may not be connecting to your screen. Here are some steps you can try to resolve the issue:

  1. Check your connections: Make sure that all cables are properly connected and that there are no loose connections. Ensure that your HDMI or other video cable is firmly plugged into both the Xbox and your screen.
  2. Check your screen settings: Ensure that your screen is set to the correct input channel, and that it is not on standby mode. You may need to switch the input channel to the HDMI input where your Xbox is connected.
  3. Check your Xbox settings: Go to the Xbox settings and make sure the video output settings are correct. You can try resetting the video settings to default by holding down the power button for 10 seconds until it beeps twice, then releasing the power button.
  4. Try a different screen or cable: If the above steps do not work, try connecting your Xbox to a different screen or using a different cable to rule out any issues with your current setup.
  5. Contact Xbox support: If you've tried all of the above steps and still cannot connect your Xbox to your screen, it may be a hardware issue possibly the Xbox or the screen hardware, and you should contact Xbox support (at 1-800-469-9269, USA) for further assistance.

I hope this helps you connect your Xbox to your screen successfully!

Thursday, February 16, 2023

Solution for Windows 10 DNS Problem

If you're experiencing DNS issues on Windows 10, there are several solutions you can try to resolve the problem:

  1. Restart your router: This may sound simple, but sometimes restarting your router can resolve DNS issues. Turn off the router, wait for a few seconds, and then turn it back on.
  2. Flush DNS cache: Sometimes, the DNS cache on your computer can become corrupted, which can lead to connectivity problems. You can flush the DNS cache by opening a command prompt and typing "ipconfig /flushdns" (without the quotes).
  3. Change DNS server: You can try changing your DNS server to a public DNS server, such as Google DNS (8.8.8.8 and 8.8.4.4) or Cloudflare DNS (1.1.1.1 and 1.0.0.1). To change your DNS server, go to Network and Internet settings, click on "Change adapter options", right-click on the network connection you're using, select "Properties", click on "Internet Protocol Version 4 (TCP/IPv4)", click on "Properties", and then enter the IP addresses of the DNS server you want to use.
  4. Disable IPv6: If you're still having DNS issues, you can try disabling IPv6 on your computer. To do this, go to Network and Internet settings, click on "Change adapter options", right-click on the network connection you're using, select "Properties", uncheck the box next to "Internet Protocol Version 6 (TCP/IPv6)", and then click "OK".
  5. Update network drivers: Sometimes, outdated or corrupted network drivers can cause DNS problems. You can try updating your network drivers by going to Device Manager, right-clicking on your network adapter, and selecting "Update driver".
If none of these solutions work, you may need to contact your Internet service provider or a professional technician for further assistance. 

Note:
Remember that doing all-above-mentioned tips may cause error to your Windows. Please be very careful, all of the the works is at your own risk.


Wednesday, February 1, 2023

Connecting to WiFi in Windows 11: Common Issues and Solutions

 Connecting to WiFi in Windows 11: Common Issues and Solutions

Windows 11 is the latest operating system released by Microsoft, and it promises to bring numerous improvements and new features. However, with new software comes new challenges, and connecting to WiFi can be one of them. In this article, we will go over some of the common problems users face when connecting to WiFi in Windows 11 and how to solve them.

  1. Incorrect Password: This is one of the most common issues when connecting to WiFi. Ensure that you have entered the correct password for your wireless network. If you are not sure, you can check the password on your router or on any other device that is already connected to the network.
  2. Outdated Network Drivers: If you are unable to connect to the WiFi network, it may be due to outdated network drivers. To update your network drivers, go to the Device Manager, right-click on your network adapter, and select "Update Driver."
  3. Interference from Other Devices: Interference from other devices, such as Bluetooth devices or microwave ovens, can cause problems with the WiFi connection. Try to keep the device away from other electronic devices.
  4. Weak Signal Strength: If your signal strength is weak, you may experience problems connecting to the WiFi network. Try moving closer to the router or removing obstacles between the device and the router.
  5. Forgotten Network Profile: If you have changed your router's password or if you have connected to a new network, Windows 11 may have forgotten the network profile. To resolve this issue, go to the "Settings" app, select "Network & Internet," and then select "WiFi." From there, click on "Manage Known Networks" and remove the network profile.

In conclusion, these are some of the common problems that users face when connecting to WiFi in Windows 11. If you are facing any other issues, try restarting your device, your router, or both. If the issue persists, consider contacting your internet service provider for further assistance.

Wednesday, January 30, 2019

Windows 10 The Best Operating System So Far

So far, Windows 10 is the best friendly operating system in the world.

According to some expert its security against virus and hacking activity is still the most fantastic among its competitors.

Considering the cost of purchasing its license, yes it is higher than any other user friendly O/S but you will be amazed when it comes to operating by your self.

Visit https://www.microsoft.com/id-id/p/windows-10-pro for more details on the purchase.

Wednesday, January 9, 2019

Need Help to Get Thousands Visitors to Your Web? New Update

We are here to help!

When you consider your web visitors is decreasing, you need a help to obtain real persons to visit your web in thousands...

Money is not everything, but obviously it requires cost. Starting from $12.00 per month, or you need only one time payment, you can be amazed on what happen to your site directly shows on Google Analytics!

Contact us for more information.

Arnold Ryan <arnold@traveltoba.com>

Sunday, December 2, 2018

How to set a default printer in Windows 10


  • To choose a default printer, press the Start button and type directly Printers > Click on Printers & scanners > select a printer > Manage. Then select Set as default. 


  • If there is no Set as default link, click "Open Printer Queue Button", Click "Printer" on the top left menu, and choose "Set as default Printer".
  • If you have Let Windows manage my default printer selected, you'll need to deselect it before you can choose a default printer on your own.
  • In Windows 10, your default can be the printer you last used. To turn on this mode, open Start  and select Settings  > Devices > Printers & scanners. Select the checkbox beside Let Windows manage my default printer.


Windows 10 game development guide

Welcome to the Windows 10 game development guide!
This guide provides an end-to-end collection of the resources and information you'll need to develop a Universal Windows Platform (UWP) game. 

Introduction to game development for the Universal Windows Platform (UWP)

When you create a Windows 10 game, you have the opportunity to reach millions of players worldwide across phone, PC, and Xbox One. With Xbox on Windows, Xbox Live, cross-device multiplayer, an amazing gaming community, and powerful new features like the Universal Windows Platform (UWP) and DirectX 12, Windows 10 games thrill players of all ages and genres. The new Universal Windows Platform (UWP) delivers compatibility for your game across Windows 10 devices with a common API for phone, PC, and Xbox One, along with tools and options to tailor your game to each device experience.
This guide provides an end-to-end collection of information and resources that will help you as you develop your game. The sections are organized according to the stages of game development, so you'll know where to look for information when you need it.
If you're new to developing games on Windows or Xbox, the Getting Started guide may be where you want to start off. The Game development resources section also provides a high-level survey of documentation, programs, and other resources that are helpful when creating a game. If you want to start by looking at some UWP code instead, see Game samples.
This guide will be updated as additional Windows 10 game development resources and material become available.

Game development resources

From documentation to developer programs, forums, blogs, and samples, there are many resources available to help you on your game development journey. Here's a roundup of resources to know about as you begin developing your Windows 10 game.


Monday, July 17, 2017

Disable Windows Defender Permanently

Press WINDOWS KEY + R or right-click start and choose run
Type gpedit.msc  - Click [OK]
Select Computer Configuration
Click arrows
> Administrative Templates
> Windows Components
click Windows Defender
On the right hand side - double-click "Turn off Windows Defender"
Click (o) Enabled
Click [OK] button

reboot your computer

Check if Defender is disabled
Click start, settings, Update & security
Windows Defender

It should be all greyed out and unable to modify.


Defender is also disabled if you install third party antivirus software (better option).

Tuesday, September 13, 2016

How to downgrade from Windows 10 to Windows 8.1

Method one: Recovery by using a previous backup


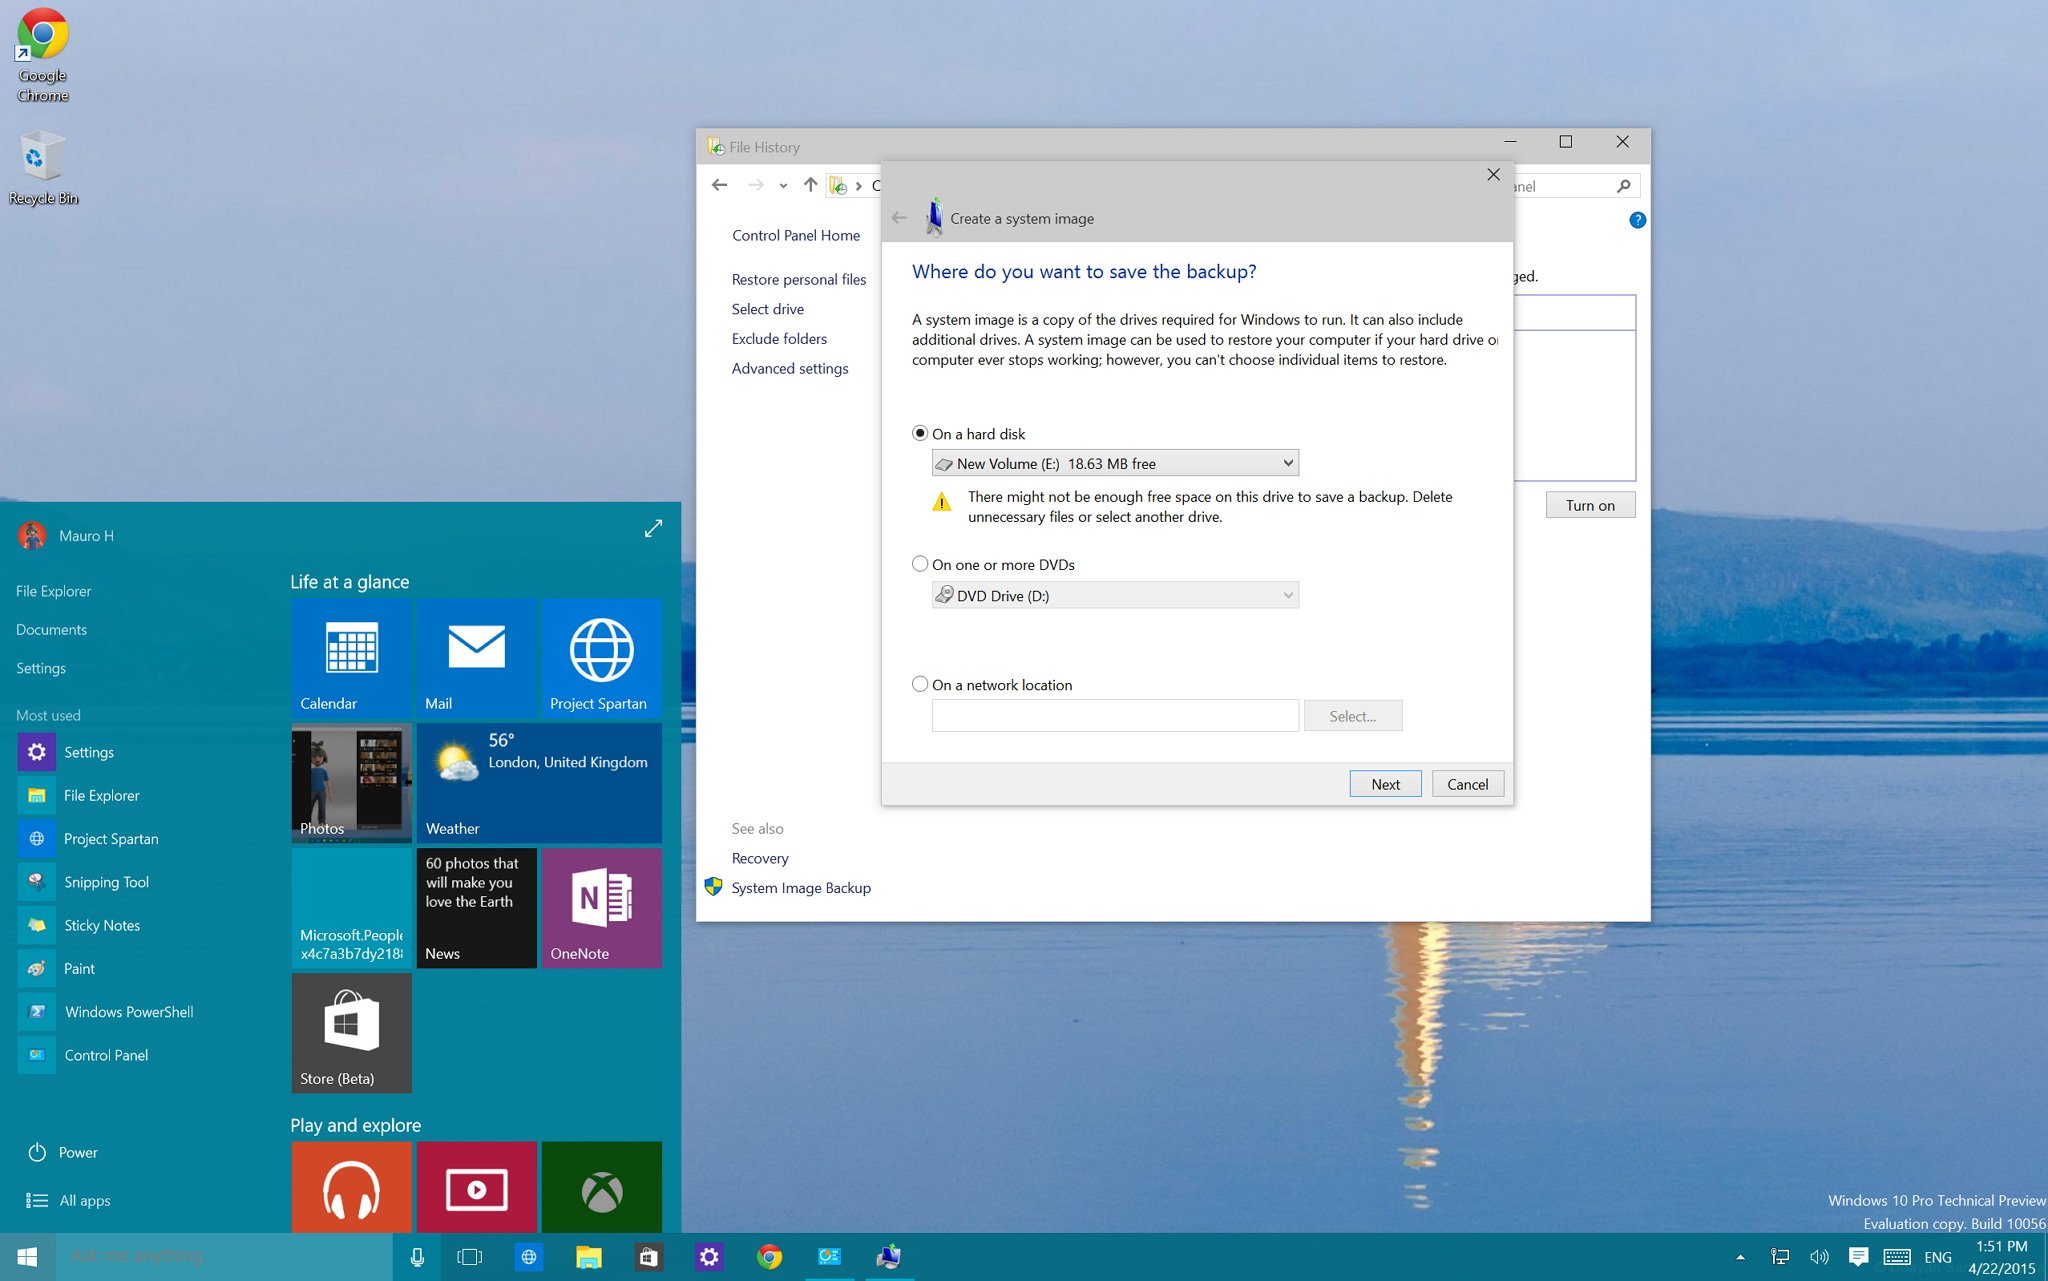
If you have been following our Windows 10 coverage, you probably came across the post: "How to prepare your PC for the Windows 10 upgrade". If you followed the guide, you have created a full backup of your computer before upgrading to Windows 10.
If you did, fantastic! You can simply make a new backup of your new files since the last full backup or just make a copy of all your files to an external hard drive. Also, note any new software installation since the last full backup, as you'll need to reinstall them after rolling back.
You can do this by:
  1. Searching for Control Panel with Cortana.
  2. Navigating to Programs and Features.
  3. Arranging the list of apps in your system by Installed On
Once you have the backup of your files, and you know the apps you need to install, reboot your computer using the "repair disc", which you're prompted to create after creating the initial full backup.
Quick Tip: If you don't have repair disc, you can also boot with the Windows 8.1 installation media to perform the recovery.
After rebooting, follow these steps:
  1. While in the Setup wizard, click Next, and then Repair your computer.
  2. Click Troubleshoot, and then click Advanced options, and select System Image Recovery.
  3. Select the operating system you to recover from, click Next, and then Finish to begin with the recovery process.
Once the process completes, you'll be back to the previous version of your operating system, in this case, Windows 8.1.
Now, if you have made a lot files changes, it'll be recommended you delete all of your files and restore the updated versions using the new backup you created before downgrading back to Windows 8.1. Also, don't forget reinstall any software since the last backup.

Method two: Recovery by clean installation

If you want to downgrade from Windows 10 to Windows 8.1 in a clean way, you'll be better off starting from scratch again. This process involves having the installation media of Windows 8.1 and performing a clean install of the operating system.
This method requires you to backup your files and to re-install all the programs on your computer. This method takes more time, but it's also the cleanest way to downgrade.
If you don't the Windows 8.1 installation media, don't worry, Microsoft now allows you to download the files from the company's servers. Follow this link and instructions.
And then follow these instructions:
  1. Reboot your computer with Windows 8.1 installation files (make sure your PC is set to boot from the drive with installation files).
  2. During the Windows Setup, click Next, accept the licensing, and click Next.
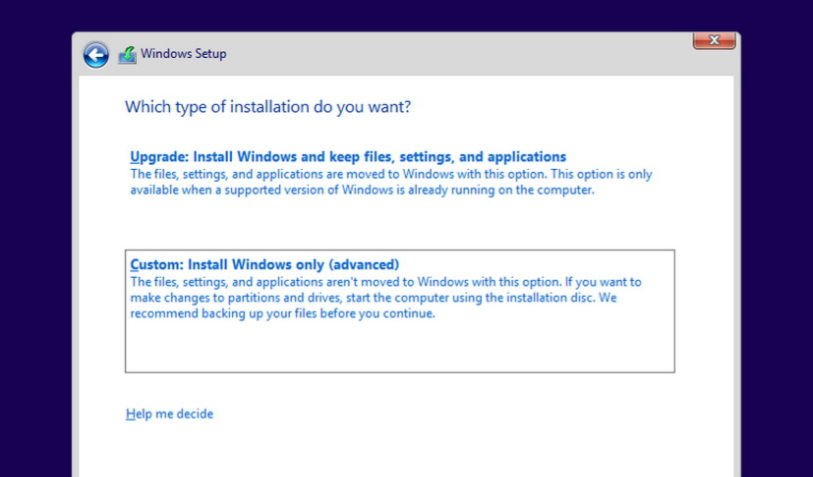
  3. Click the option Custom: Install Windows only (Advanced) option to do a clean installation.
  4. Delete any partition created by you current operating system.
  5. Select the empty drive and click Next to begin the installation process.
Important: If you have a dedicated partition to store files or a secondary hard drive, you don't have to delete these partitions.
After the installation process completes, you'll be back to your previous version of Windows. Now the only thing left to do is to restore your documents and other files from the backup, and you'll need to re-install any software you have previously installed.

Method three: Recovery by uninstalling Windows 10

Then there is the third option. Unlike Windows 8.x, Microsoft has conveniently included a roll back option in the new Settings app that allows users to go seamlessly back to their previous version of the operating system with a single button.
If you happened not to like Windows 10, or you're having issues, Microsoft is adding the "Go back to Windows 8.1" feature to make the process a lot easier. However, the downside is that you only have a month after you upgrade to Windows 10 to go back. If you're still within a month after the upgrade you can follow these steps to go back:
1- Use the Windows + I shortcut to open the Settings app.
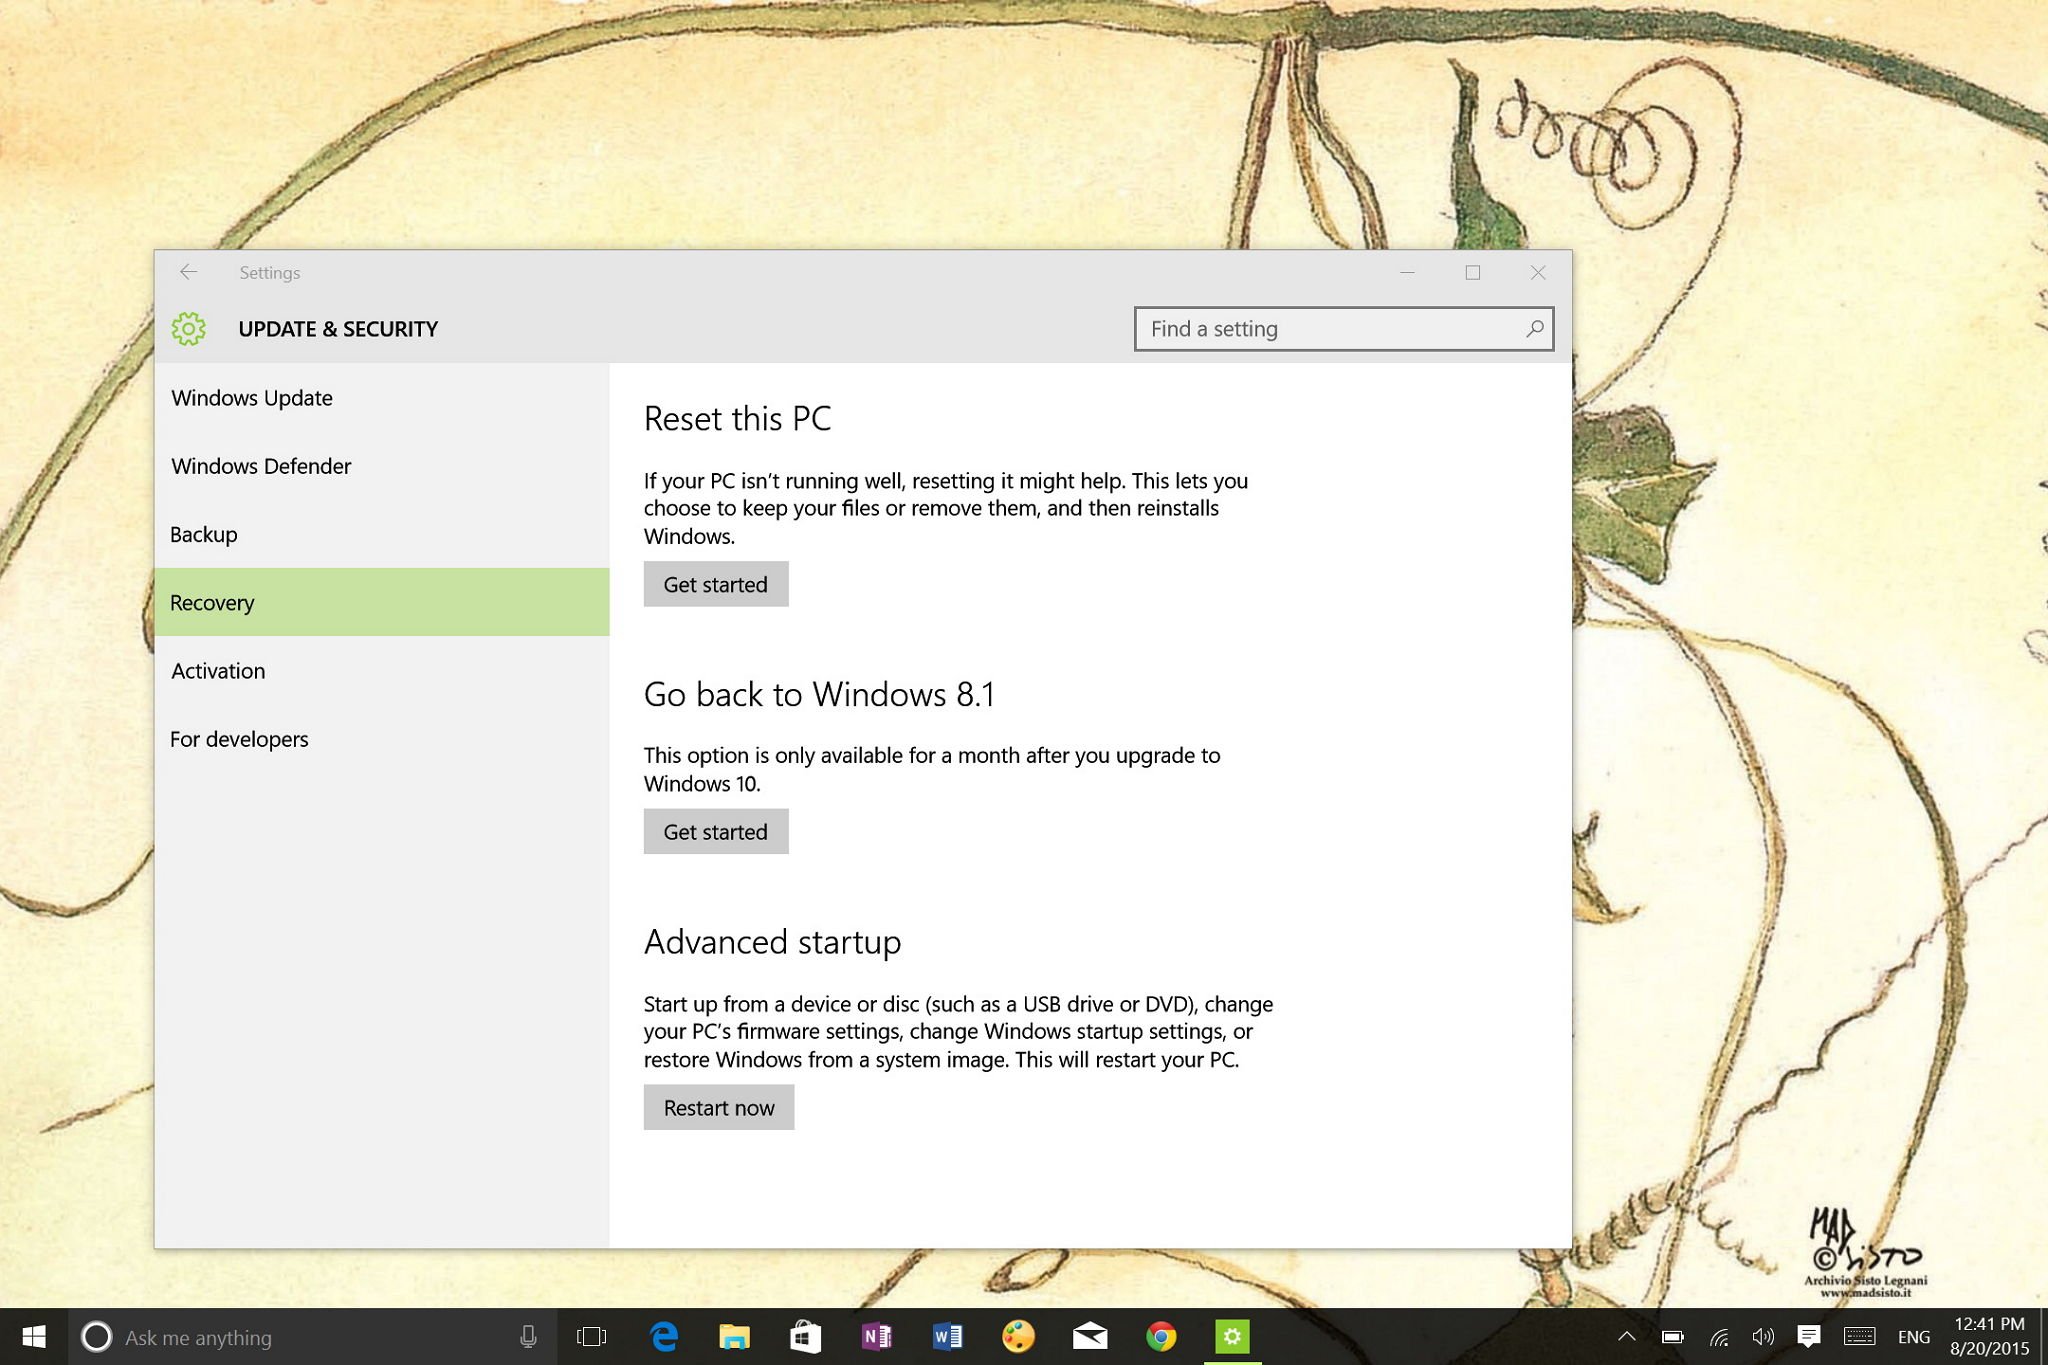
2- Navigate to Update & security and go to Recovery.
3- If everything is set correctly in your system, you'll see the option Go back to Windows 8.1. Here simply click the Get started button.
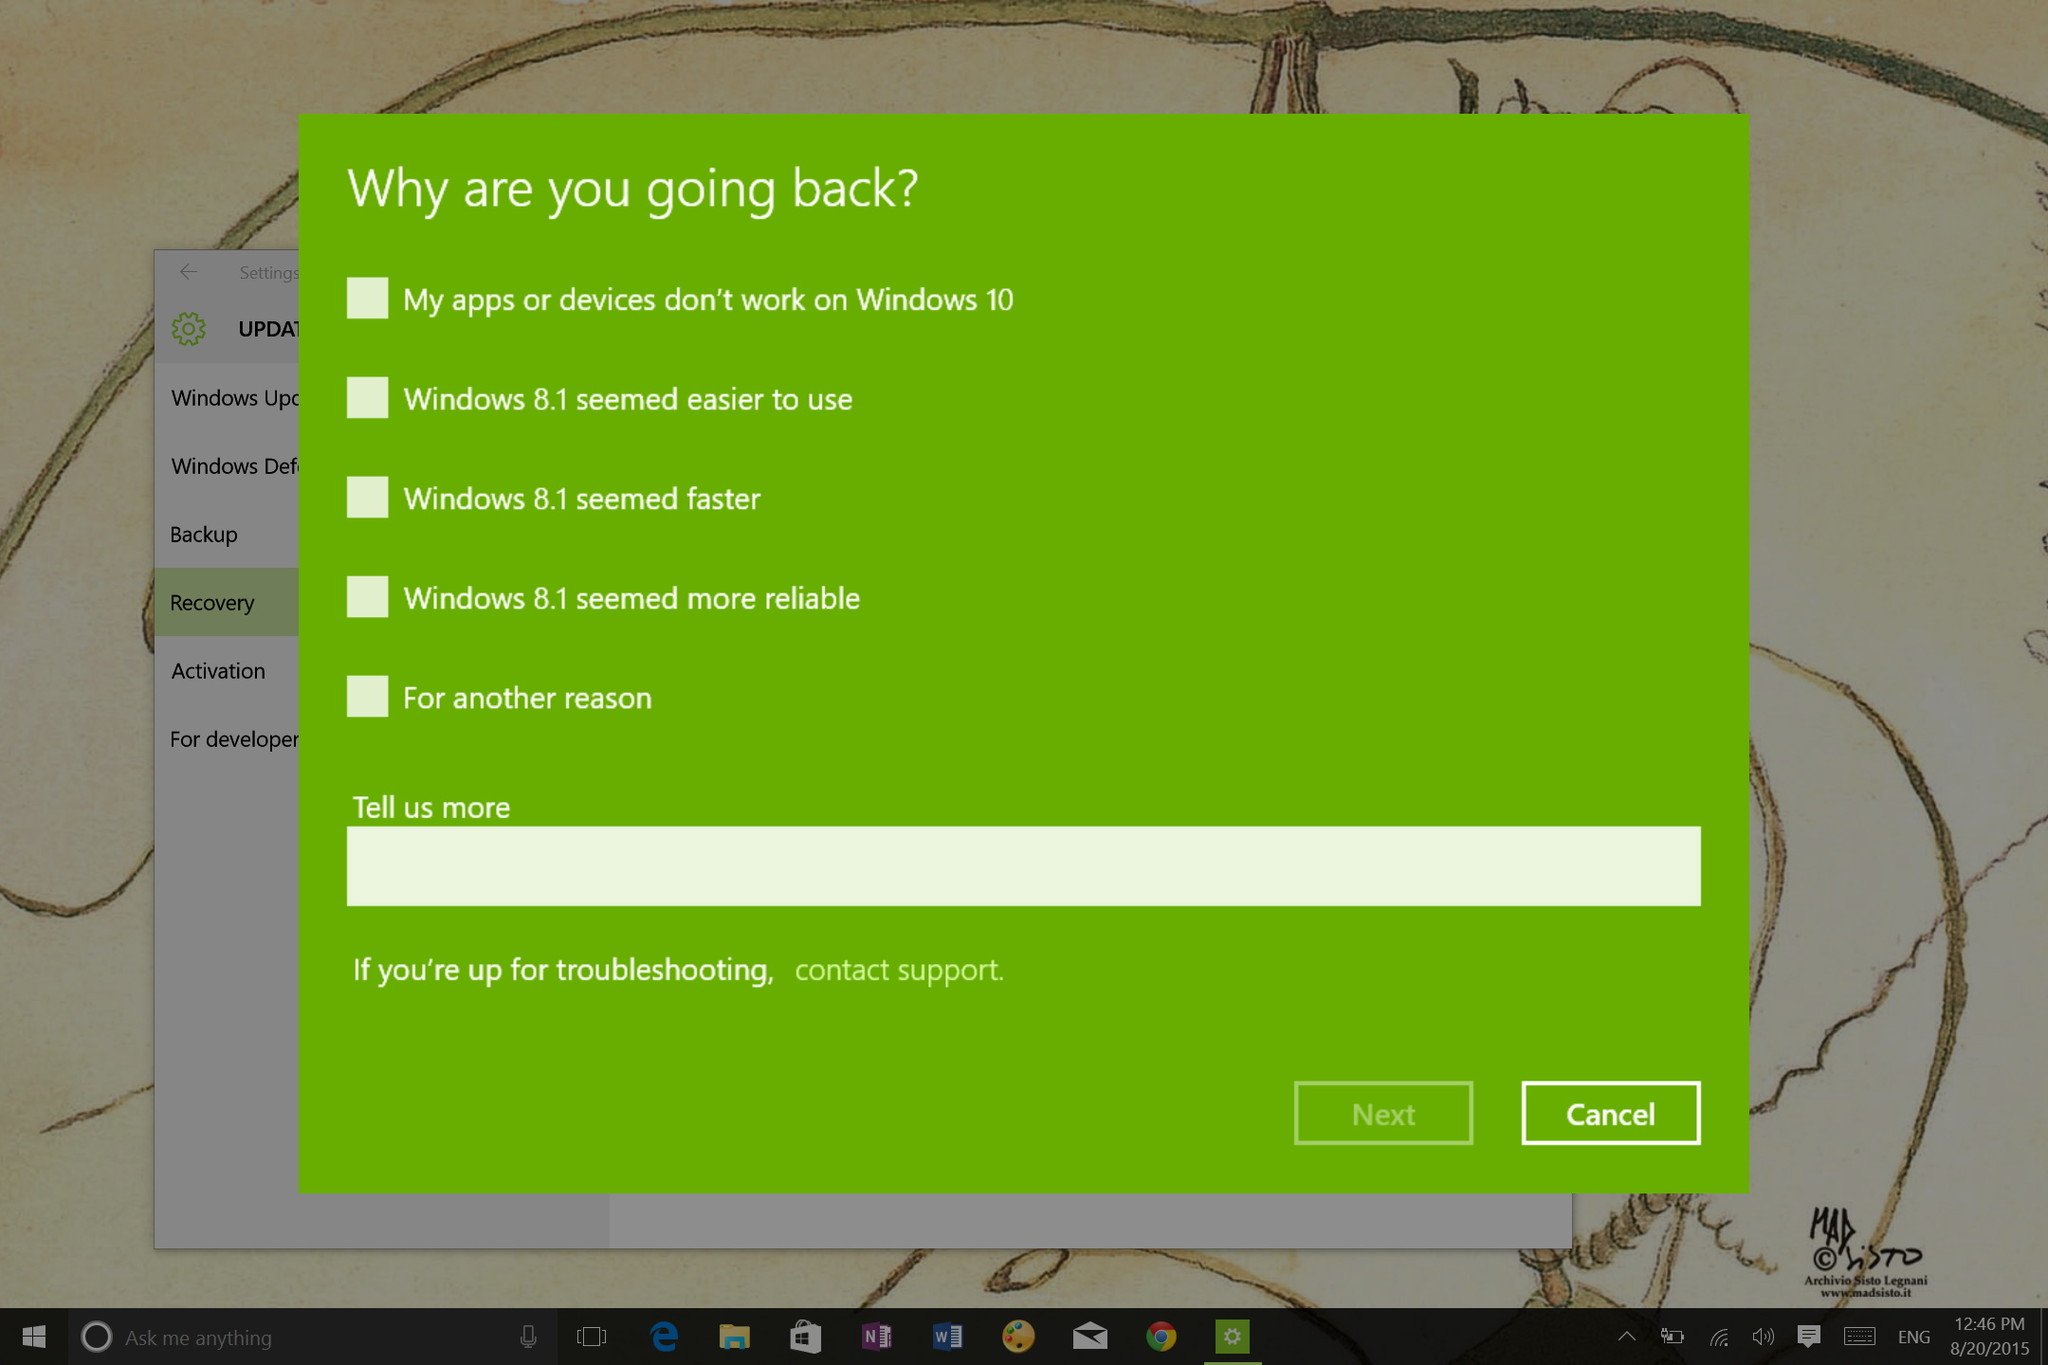
4- At this point, you can tell Microsoft why you're going back, click Next.
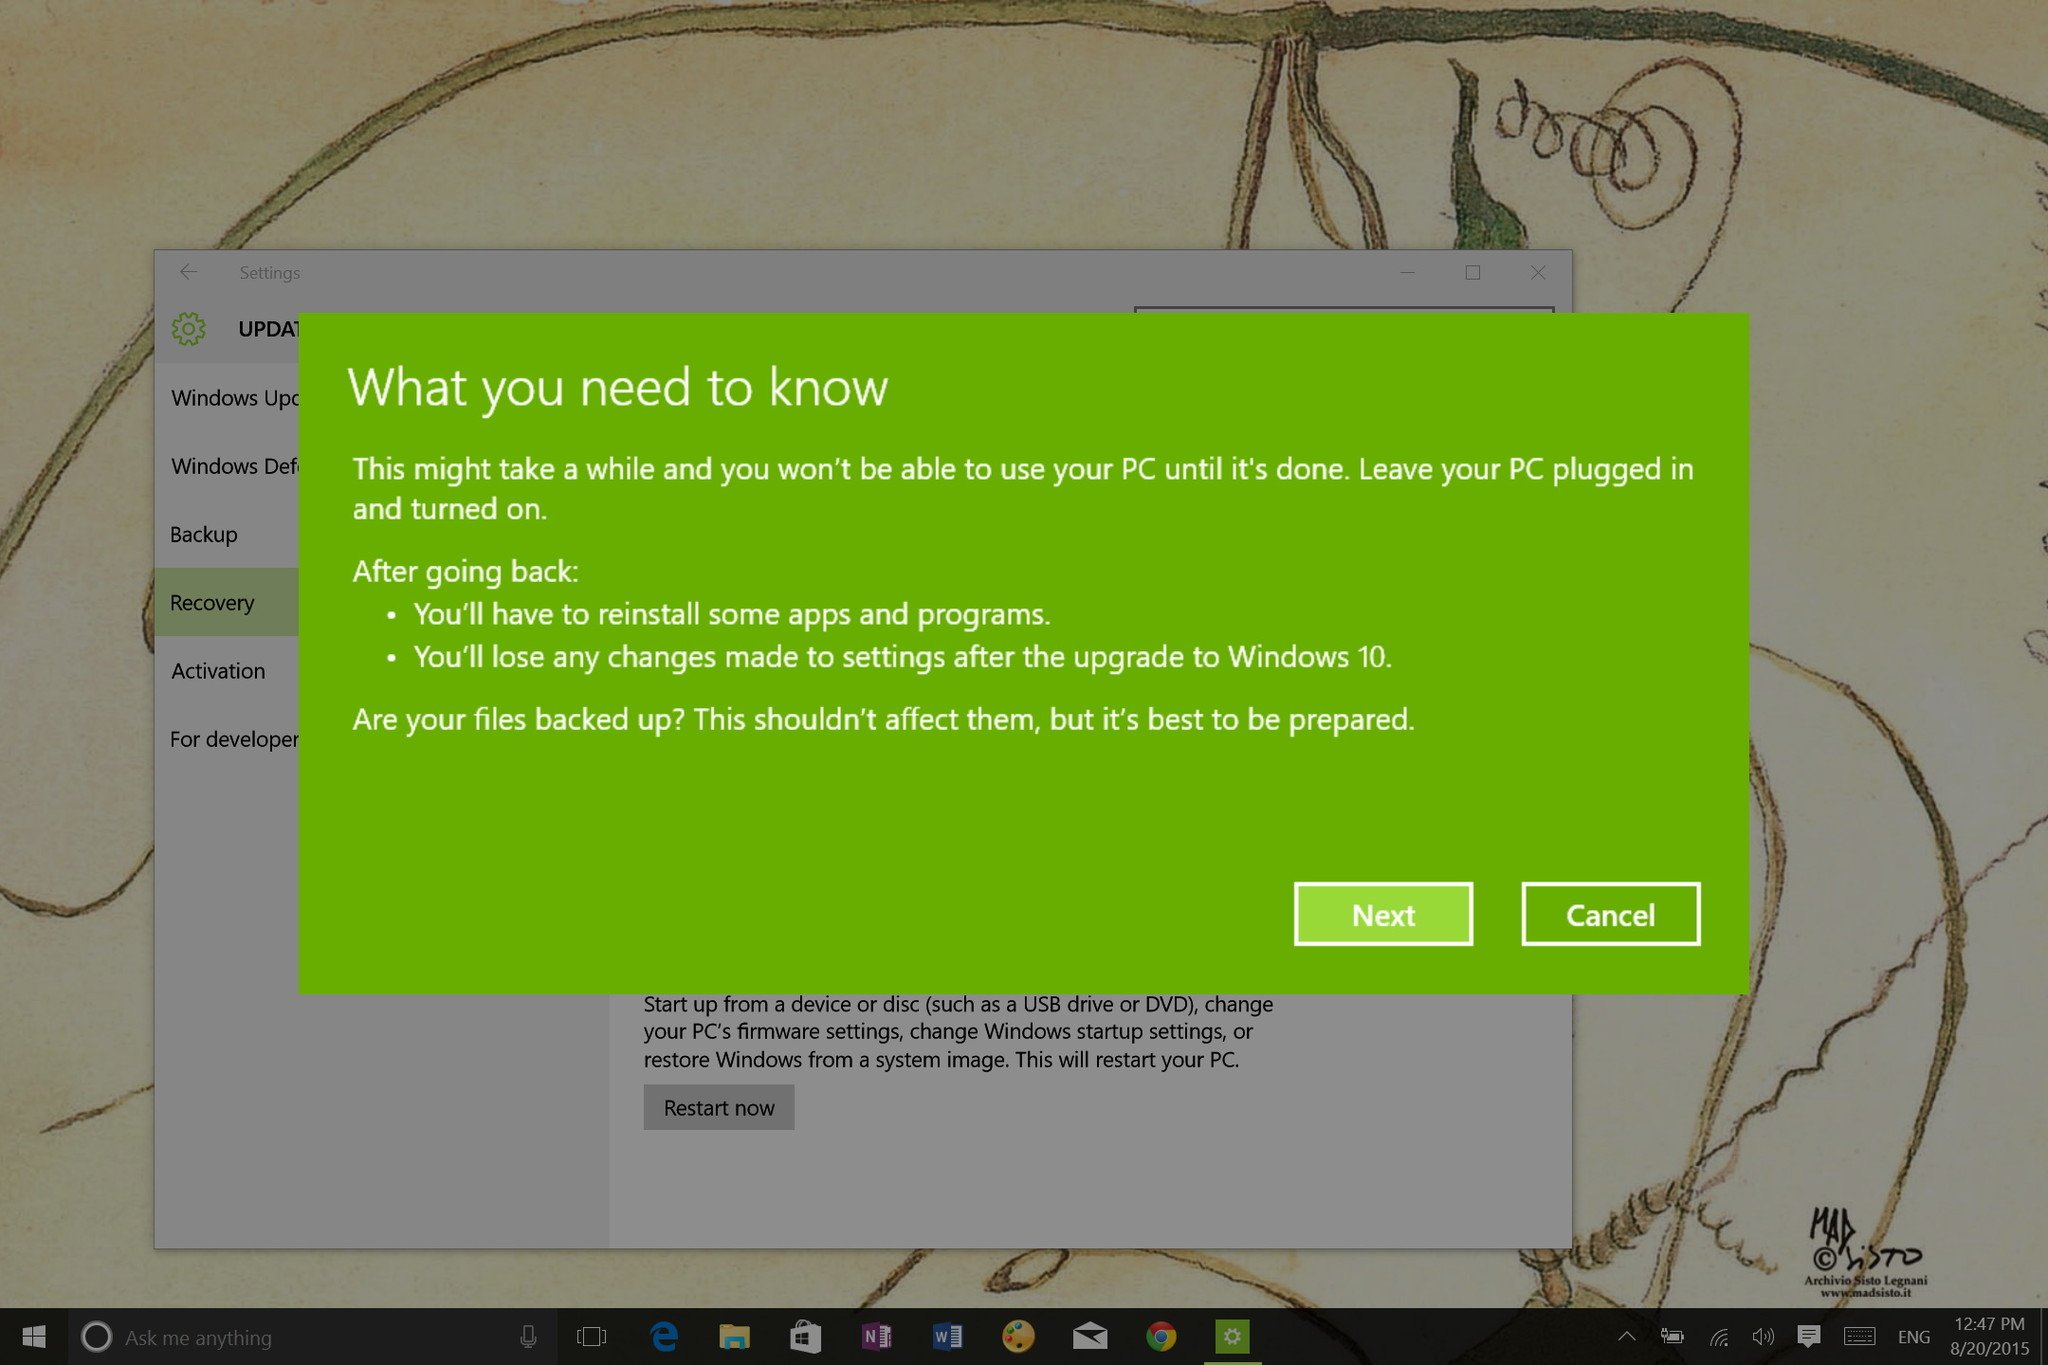
5- You'll get a warning that you'll need to reinstall some apps and programs, and you'll lose any changes made after upgrading to Windows 10. A file backup is not necessary but recommended. And then click Next.
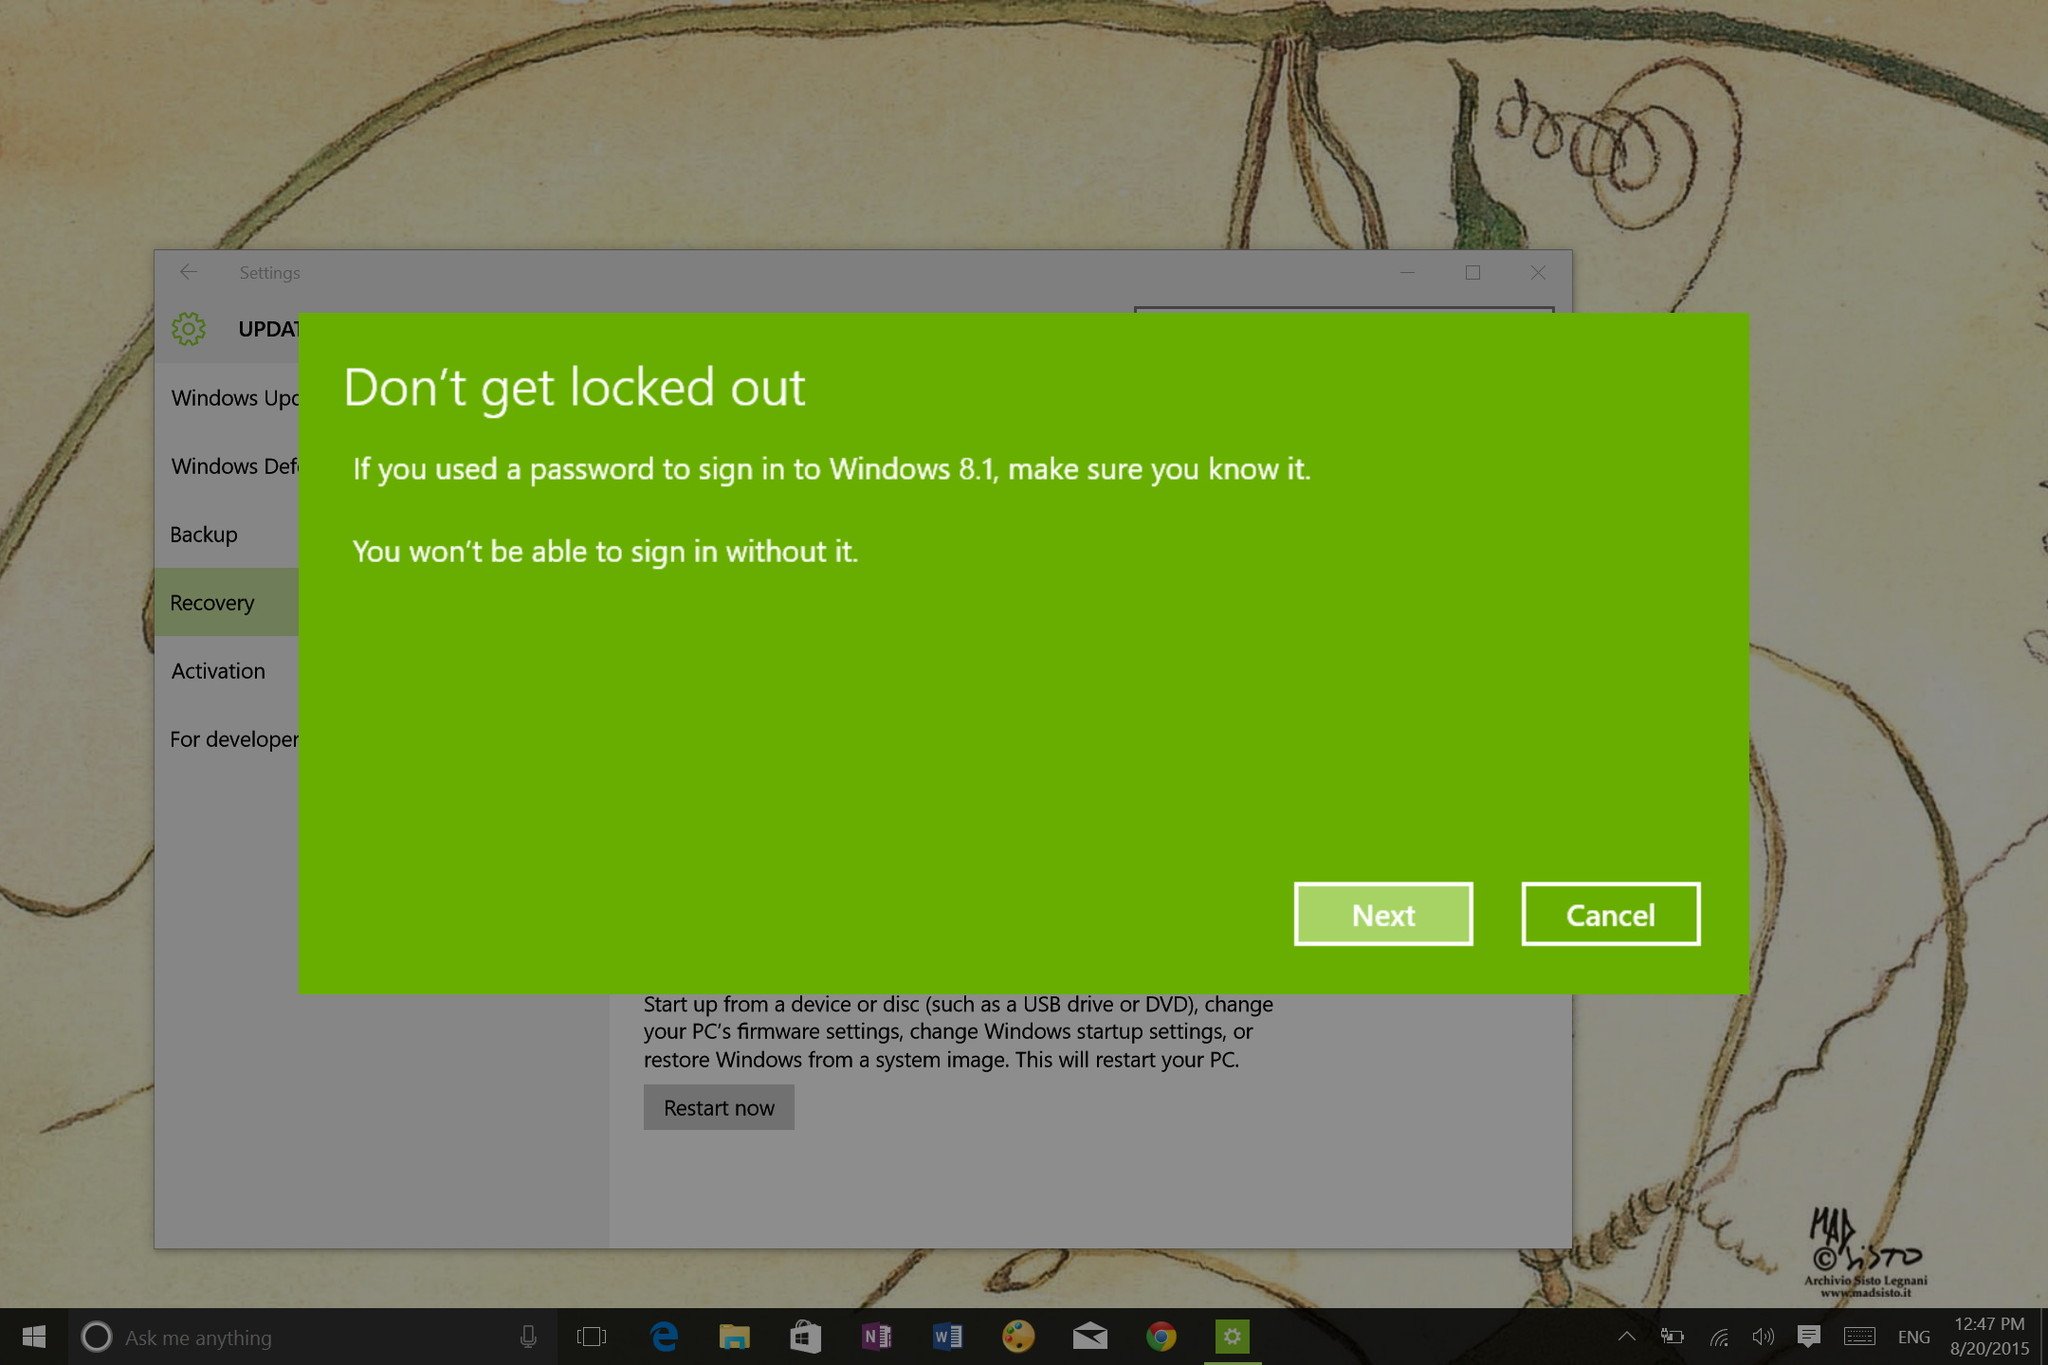
6- Make sure you know your Windows 8.1 password as you'll be locked out of the system without it, and then click Next.
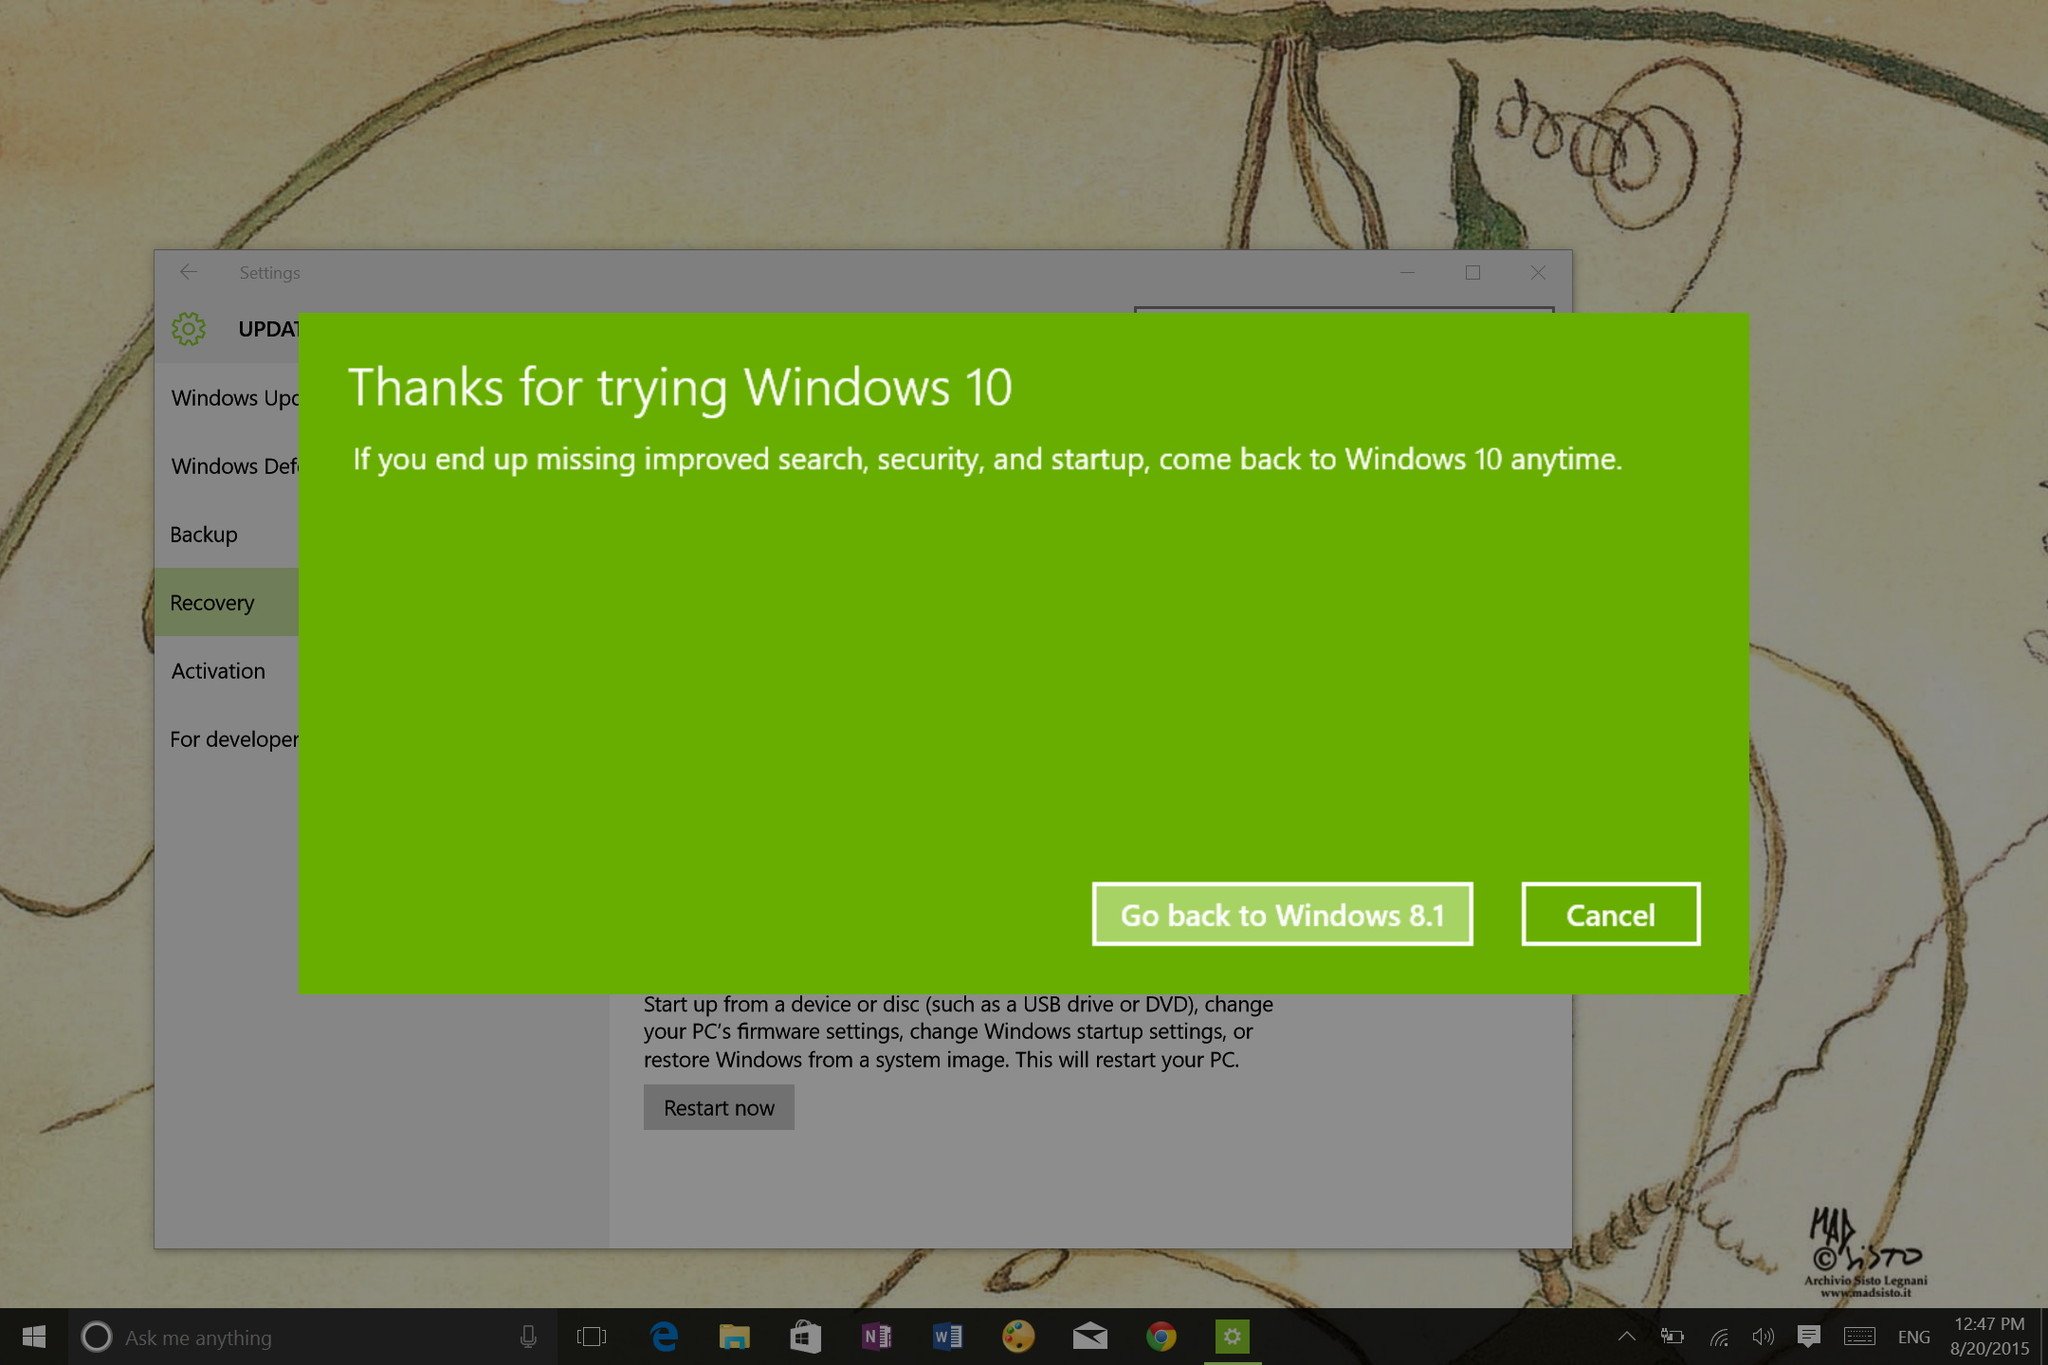
7- Finally, click the Go back to Windows 8.1 and let the process complete.
The process will take some time depending on your system configuration. Once you're back on Windows 8.1, don't forget to check all your apps are installed correctly and check for new updates, as, after a few weeks, it's likely to be out-of-date.
That's all!
Source: http://www.windowscentral.com/how-downgrade-windows-10-windows-81

Wednesday, August 31, 2016

Upgrade to Windows 10: FAQ


Is the Windows 10 free upgrade offer still available?
No, the Windows 10 free upgrade offer ended on July 29, 2016.

Windows 10 will continue to be available for purchase, either on a device or as a full version of the software. A discounted "upgrade" version of Windows 10 will not be for sale.

How do I get Windows 10?
Windows 10 will continue to be available for purchase, either on a device or as a full version of the software.

Do I still qualify for the free upgrade offer if I've already downloaded Windows 10 to a USB drive, but haven't yet upgraded my device?
All upgrades must have completed and reached the "Welcome" screen by 11:59 PM UTC-10 (Hawaii) on July 29; this is one worldwide point in time.

Will the media creation tool still be available for customers to download Windows 10 installation media? 
Yes, the media creation tool and Windows 10 installation media (ISO files) are available for customers to install Windows 10. If you’re installing Windows 10 for the first time, you’ll need to enter a valid Windows 10 product key or buy a full version of Windows 10 during setup, for this tool to work. If you’ve previously installed Windows 10 on your device, you should have a digital license and Windows 10 will automatically activate without entering a product key.

How do I reinstall Windows 10 on my PC?
After you upgrade to Windows 10, you can reinstall or do a clean installation on the same device. You won't need a product key to reactivate Windows 10 on the same hardware. For more info on how to create your own Windows 10 installation media, see the Microsoft software download website. 

Will Windows 10 work with the assistive technologies on my device?
We're committed to make sure customers using assistive technologies can upgrade to Windows 10. For more info about the free upgrade offer for customers using assistive technologies, see Accessibility and the Windows 10 free upgrade.