Welcome to Free PC Helpdesk

Computer Helpdesk for free.

Welcome!

Having problems with your Win XP/7/10? Then this Blog is right for you! Just follow below instructions.

My suggestion is to print the text first so you can easily do the steps.

Enjoy!

Please note, that this Blog does not take any responsibility if something worst happened to your computer. Please follow the steps carefully at your own risk.


Showing posts with label Windows 10. Show all posts

Thursday, February 23, 2023

Problems Printing with Your HP DeskJet Plus 4155 All-in-One

If you are experiencing problems printing with your HP DeskJet Plus 4155 all-in-one printer on Windows 10, you can try the following troubleshooting steps:

  1. Check the printer connections: Make sure that your printer is properly connected to your computer via USB cable or Wi-Fi. If you are using Wi-Fi, ensure that your printer is connected to the same network as your computer.
  2. Restart your printer and computer: Sometimes, restarting your printer and computer can resolve common printing issues. Turn off both devices and wait for a few seconds before turning them back on.
  3. Update or reinstall printer drivers: Outdated or corrupted printer drivers can cause printing problems. You can try updating or reinstalling the printer drivers by going to the HP support website and downloading the latest drivers for your printer model.
  4. Clear print queue: Sometimes, print jobs can get stuck in the print queue and cause issues. You can try clearing the print queue by going to Devices and Printers in the Control Panel, right-clicking on your printer, and selecting See what's printing > Cancel all documents.
  5. Run printer troubleshooter: Windows 10 has a built-in printer troubleshooter that can help diagnose and resolve common printing issues. You can access the troubleshooter by going to Settings (press Win + I on the keyboard) > Update & Security > Troubleshoot > Printer > Run the troubleshooter.

If none of the above steps resolve your printing issues, you may need to contact HP support for further assistance.

Wednesday, January 30, 2019

Windows 10 The Best Operating System So Far

So far, Windows 10 is the best friendly operating system in the world.

According to some expert its security against virus and hacking activity is still the most fantastic among its competitors.

Considering the cost of purchasing its license, yes it is higher than any other user friendly O/S but you will be amazed when it comes to operating by your self.

Visit https://www.microsoft.com/id-id/p/windows-10-pro for more details on the purchase.

Sunday, December 2, 2018

How to set a default printer in Windows 10


  • To choose a default printer, press the Start button and type directly Printers > Click on Printers & scanners > select a printer > Manage. Then select Set as default


  • If there is no Set as default link, click "Open Printer Queue Button", Click "Printer" on the top left menu, and choose "Set as default Printer".
  • If you have Let Windows manage my default printer selected, you'll need to deselect it before you can choose a default printer on your own.
  • In Windows 10, your default can be the printer you last used. To turn on this mode, open Start  and select Settings  > Devices > Printers & scanners. Select the checkbox beside Let Windows manage my default printer.


Windows 10 game development guide

Welcome to the Windows 10 game development guide!
This guide provides an end-to-end collection of the resources and information you'll need to develop a Universal Windows Platform (UWP) game. 

Introduction to game development for the Universal Windows Platform (UWP)

When you create a Windows 10 game, you have the opportunity to reach millions of players worldwide across phone, PC, and Xbox One. With Xbox on Windows, Xbox Live, cross-device multiplayer, an amazing gaming community, and powerful new features like the Universal Windows Platform (UWP) and DirectX 12, Windows 10 games thrill players of all ages and genres. The new Universal Windows Platform (UWP) delivers compatibility for your game across Windows 10 devices with a common API for phone, PC, and Xbox One, along with tools and options to tailor your game to each device experience.
This guide provides an end-to-end collection of information and resources that will help you as you develop your game. The sections are organized according to the stages of game development, so you'll know where to look for information when you need it.
If you're new to developing games on Windows or Xbox, the Getting Started guide may be where you want to start off. The Game development resources section also provides a high-level survey of documentation, programs, and other resources that are helpful when creating a game. If you want to start by looking at some UWP code instead, see Game samples.
This guide will be updated as additional Windows 10 game development resources and material become available.

Game development resources

From documentation to developer programs, forums, blogs, and samples, there are many resources available to help you on your game development journey. Here's a roundup of resources to know about as you begin developing your Windows 10 game.


Monday, July 17, 2017

Disable Windows Defender Permanently

Press WINDOWS KEY + R or right-click start and choose run
Type gpedit.msc  - Click [OK]
Select Computer Configuration
Click arrows
> Administrative Templates
> Windows Components
click Windows Defender
On the right hand side - double-click "Turn off Windows Defender"
Click (o) Enabled
Click [OK] button

reboot your computer

Check if Defender is disabled
Click start, settings, Update & security
Windows Defender

It should be all greyed out and unable to modify.


Defender is also disabled if you install third party antivirus software (better option).

Tuesday, September 13, 2016

How to downgrade from Windows 10 to Windows 8.1

Method one: Recovery by using a previous backup


If you have been following our Windows 10 coverage, you probably came across the post: "How to prepare your PC for the Windows 10 upgrade". If you followed the guide, you have created a full backup of your computer before upgrading to Windows 10.
If you did, fantastic! You can simply make a new backup of your new files since the last full backup or just make a copy of all your files to an external hard drive. Also, note any new software installation since the last full backup, as you'll need to reinstall them after rolling back.
You can do this by:
  1. Searching for Control Panel with Cortana.
  2. Navigating to Programs and Features.
  3. Arranging the list of apps in your system by Installed On
Once you have the backup of your files, and you know the apps you need to install, reboot your computer using the "repair disc", which you're prompted to create after creating the initial full backup.
Quick Tip: If you don't have repair disc, you can also boot with the Windows 8.1 installation media to perform the recovery.
After rebooting, follow these steps:
  1. While in the Setup wizard, click Next, and then Repair your computer.
  2. Click Troubleshoot, and then click Advanced options, and select System Image Recovery.
  3. Select the operating system you to recover from, click Next, and then Finish to begin with the recovery process.
Once the process completes, you'll be back to the previous version of your operating system, in this case, Windows 8.1.
Now, if you have made a lot files changes, it'll be recommended you delete all of your files and restore the updated versions using the new backup you created before downgrading back to Windows 8.1. Also, don't forget reinstall any software since the last backup.

Method two: Recovery by clean installation

If you want to downgrade from Windows 10 to Windows 8.1 in a clean way, you'll be better off starting from scratch again. This process involves having the installation media of Windows 8.1 and performing a clean install of the operating system.
This method requires you to backup your files and to re-install all the programs on your computer. This method takes more time, but it's also the cleanest way to downgrade.
If you don't the Windows 8.1 installation media, don't worry, Microsoft now allows you to download the files from the company's servers. Follow this link and instructions.
And then follow these instructions:
  1. Reboot your computer with Windows 8.1 installation files (make sure your PC is set to boot from the drive with installation files).
  2. During the Windows Setup, click Next, accept the licensing, and click Next.
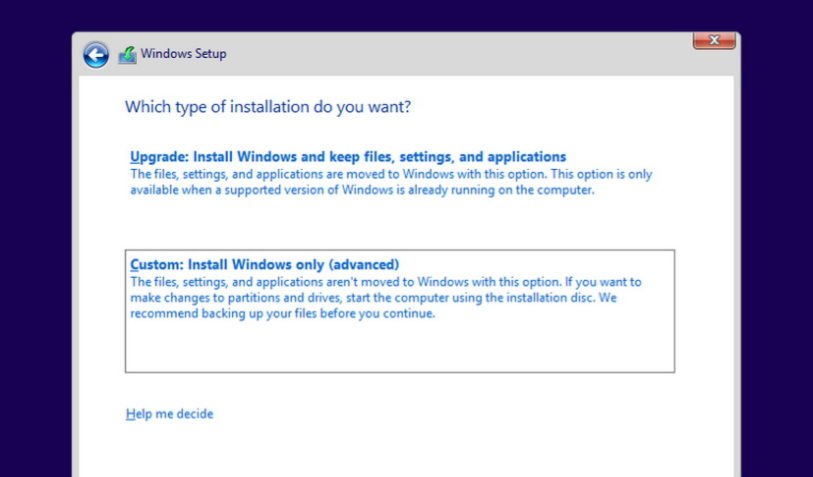
  3. Click the option Custom: Install Windows only (Advanced) option to do a clean installation.
  4. Delete any partition created by you current operating system.
  5. Select the empty drive and click Next to begin the installation process.
Important: If you have a dedicated partition to store files or a secondary hard drive, you don't have to delete these partitions.
After the installation process completes, you'll be back to your previous version of Windows. Now the only thing left to do is to restore your documents and other files from the backup, and you'll need to re-install any software you have previously installed.

Method three: Recovery by uninstalling Windows 10

Then there is the third option. Unlike Windows 8.x, Microsoft has conveniently included a roll back option in the new Settings app that allows users to go seamlessly back to their previous version of the operating system with a single button.
If you happened not to like Windows 10, or you're having issues, Microsoft is adding the "Go back to Windows 8.1" feature to make the process a lot easier. However, the downside is that you only have a month after you upgrade to Windows 10 to go back. If you're still within a month after the upgrade you can follow these steps to go back:
1- Use the Windows + I shortcut to open the Settings app.
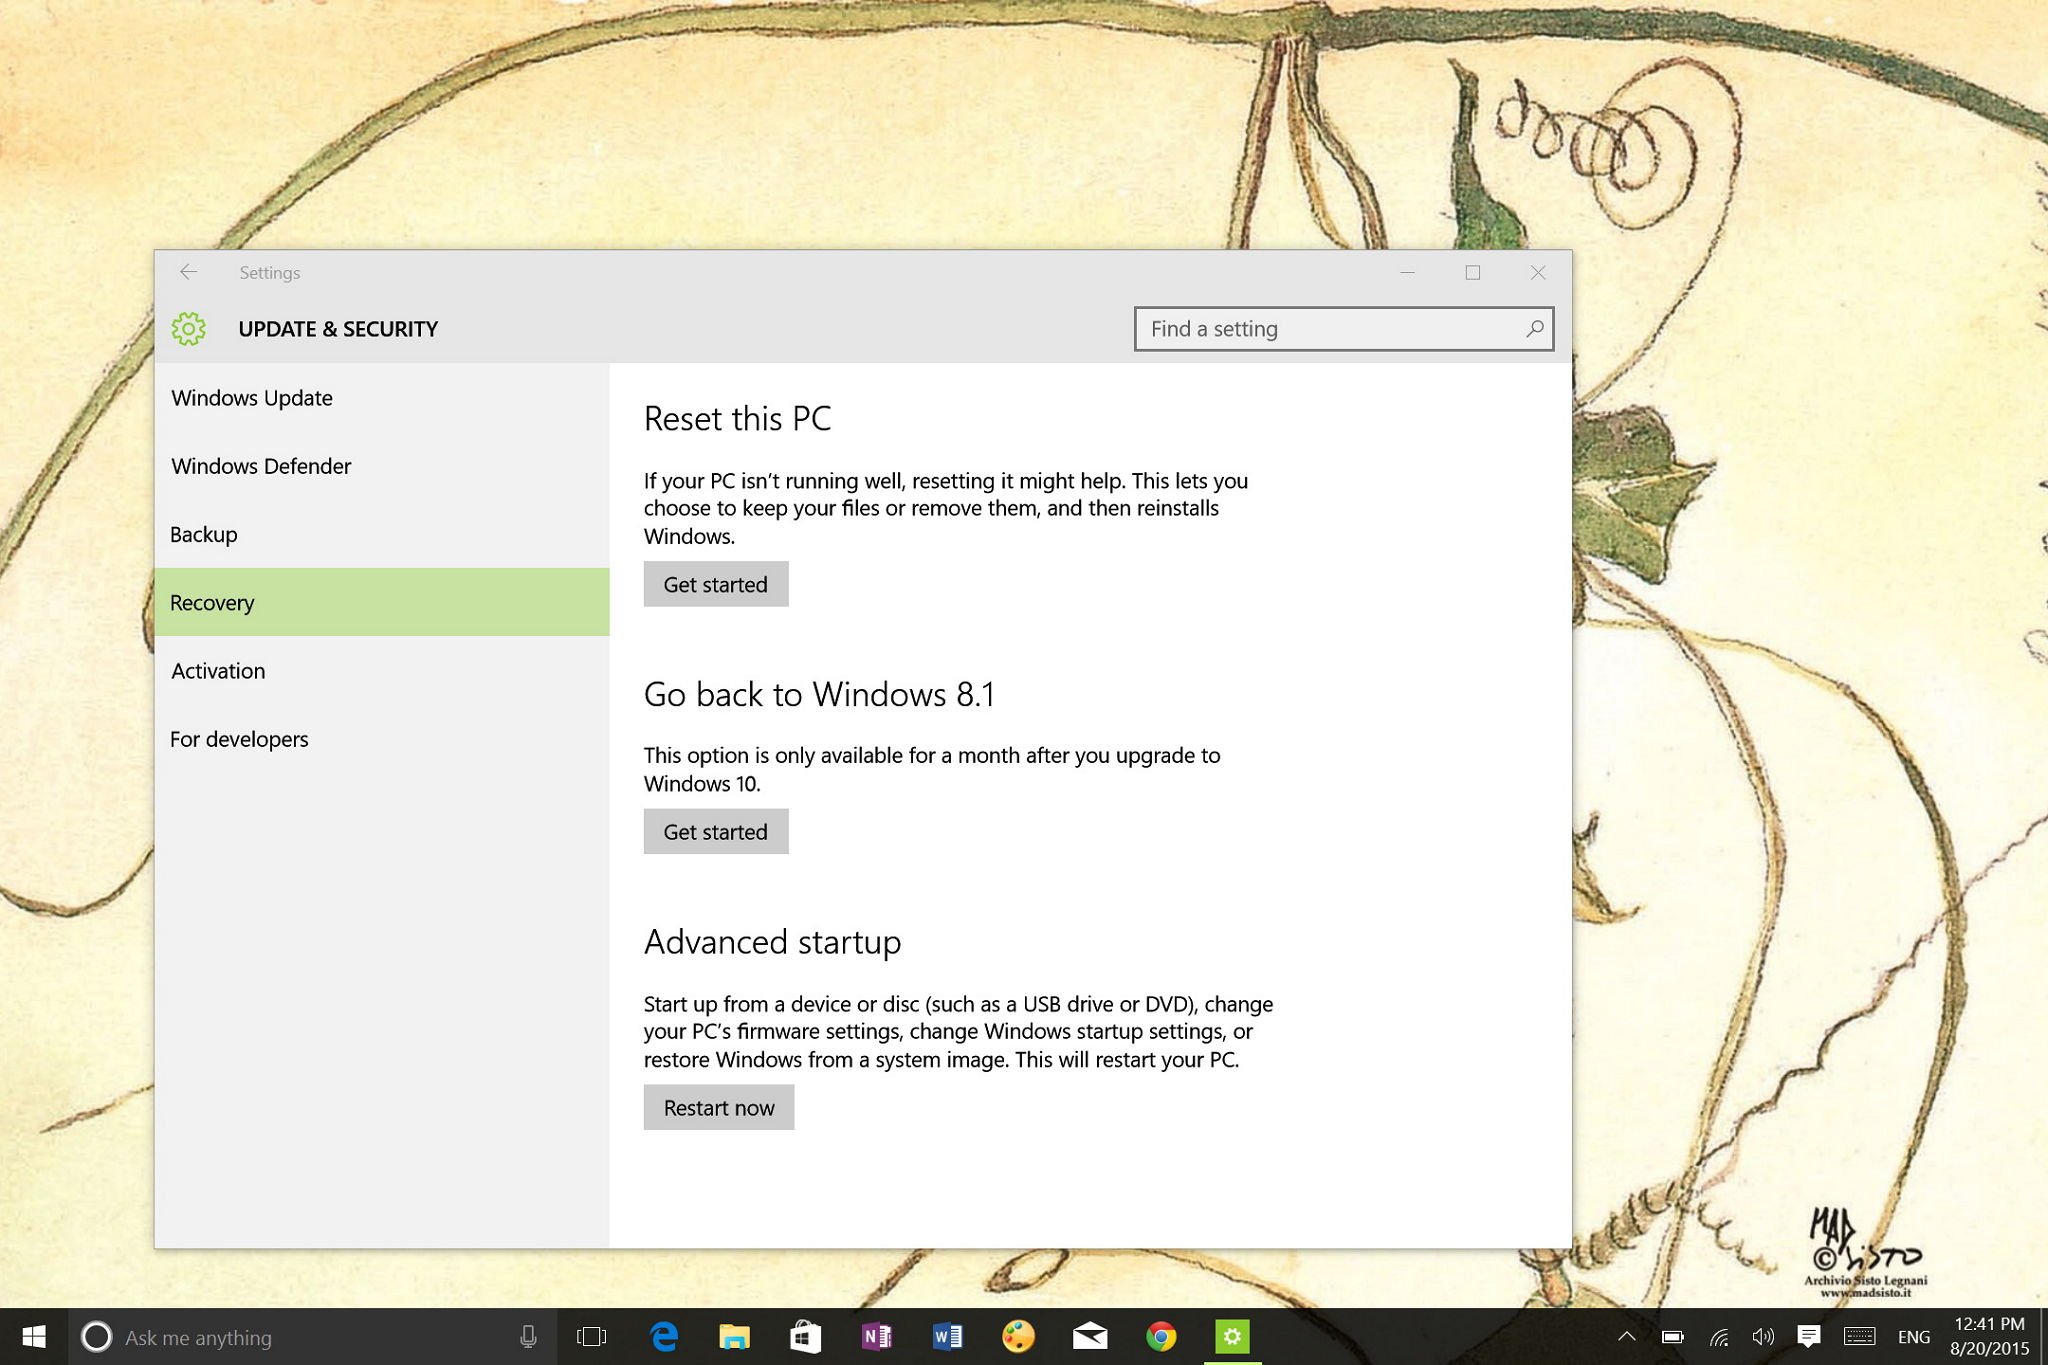
2- Navigate to Update & security and go to Recovery.
3- If everything is set correctly in your system, you'll see the option Go back to Windows 8.1. Here simply click the Get started button.
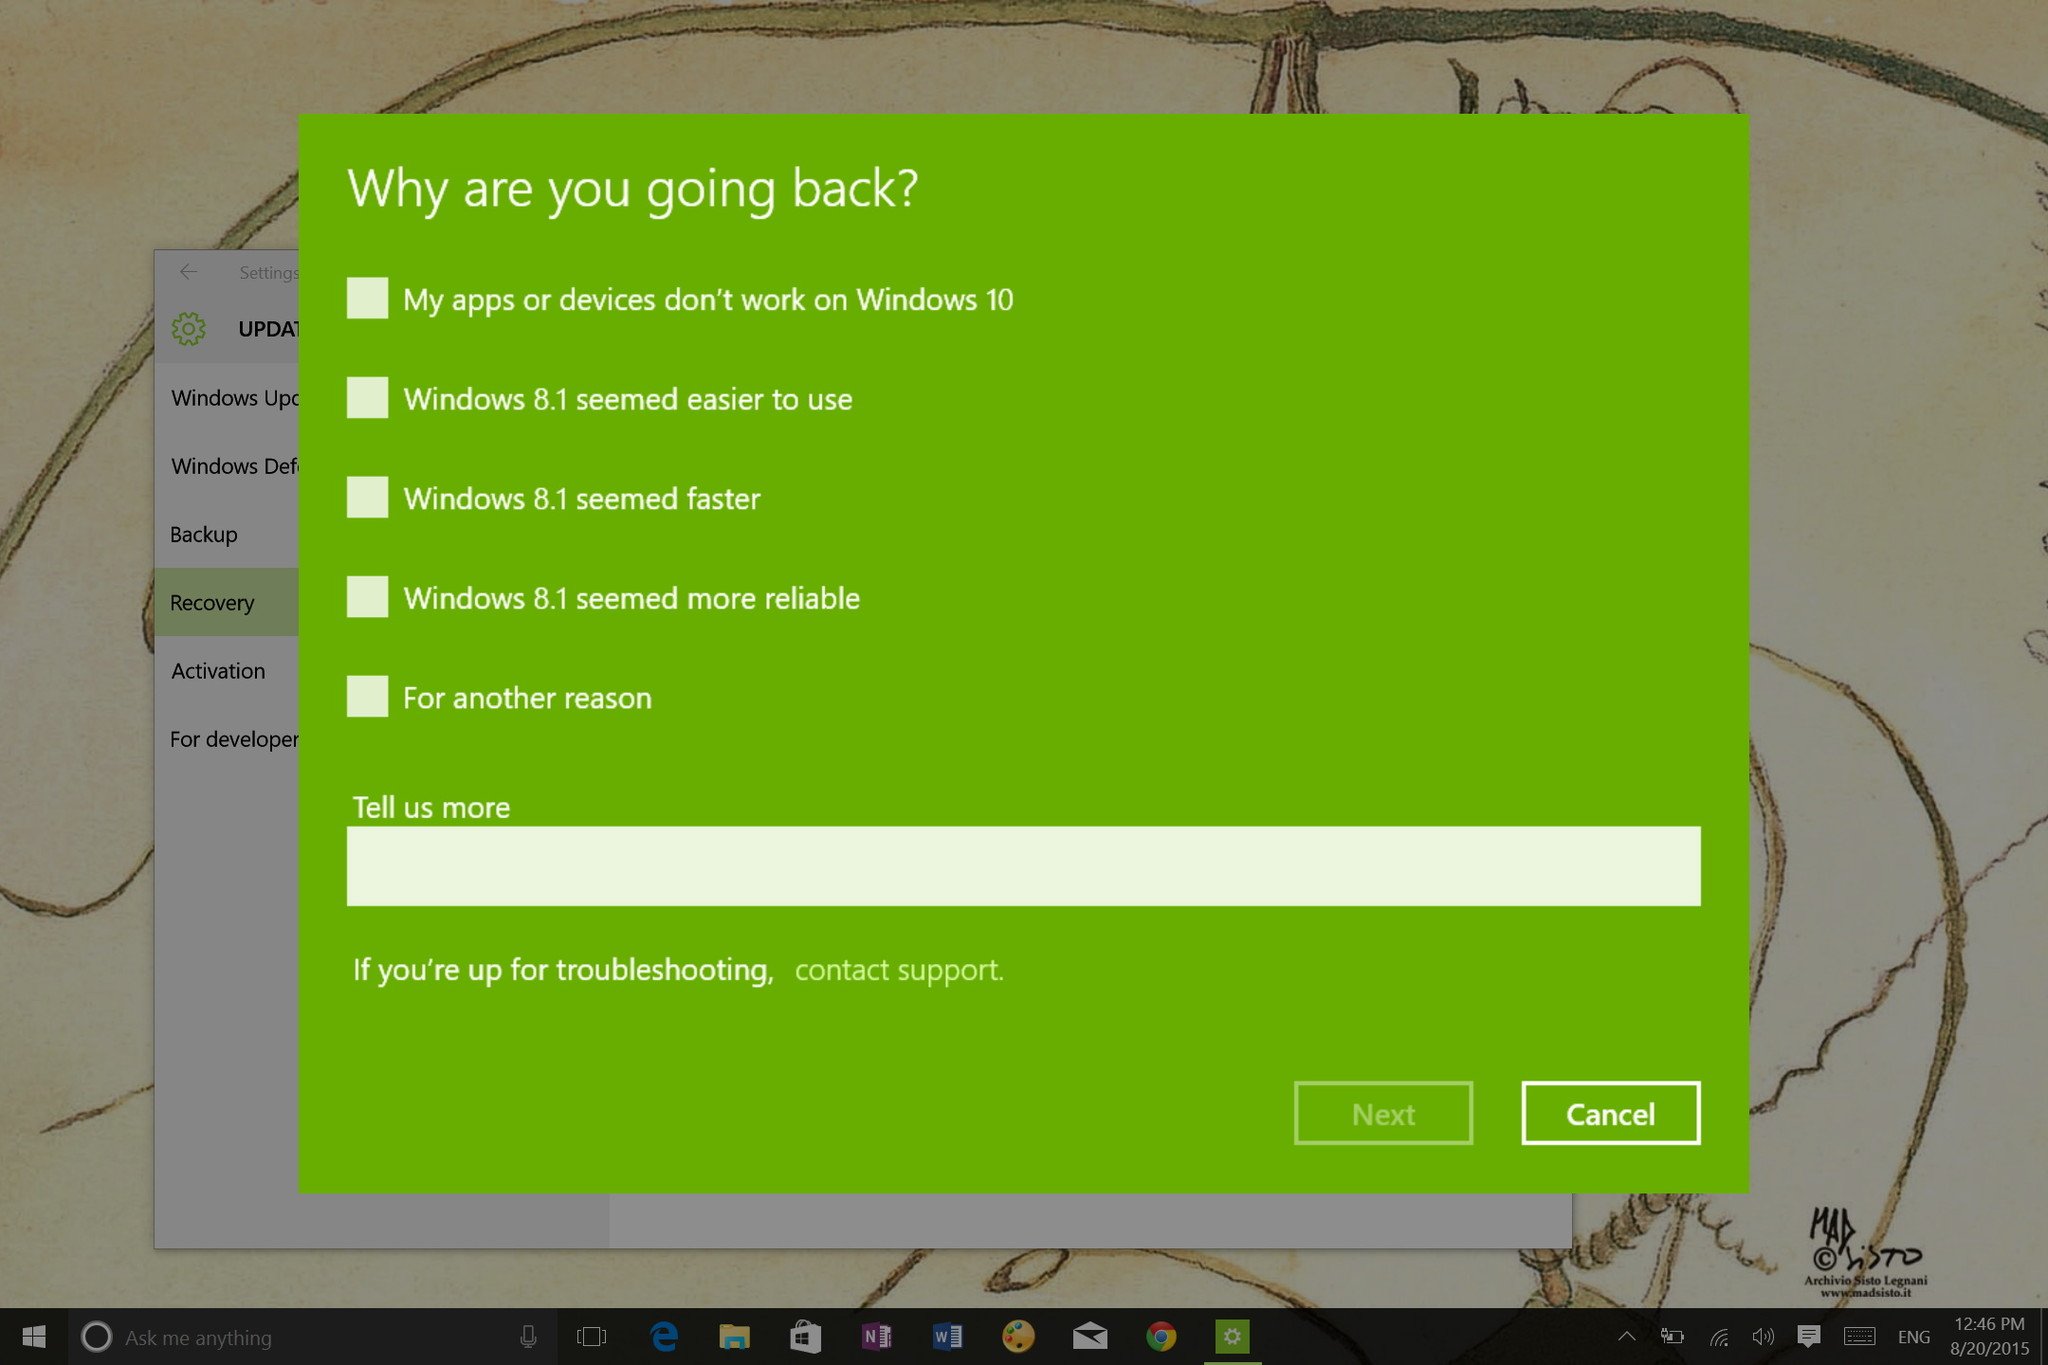
4- At this point, you can tell Microsoft why you're going back, click Next.
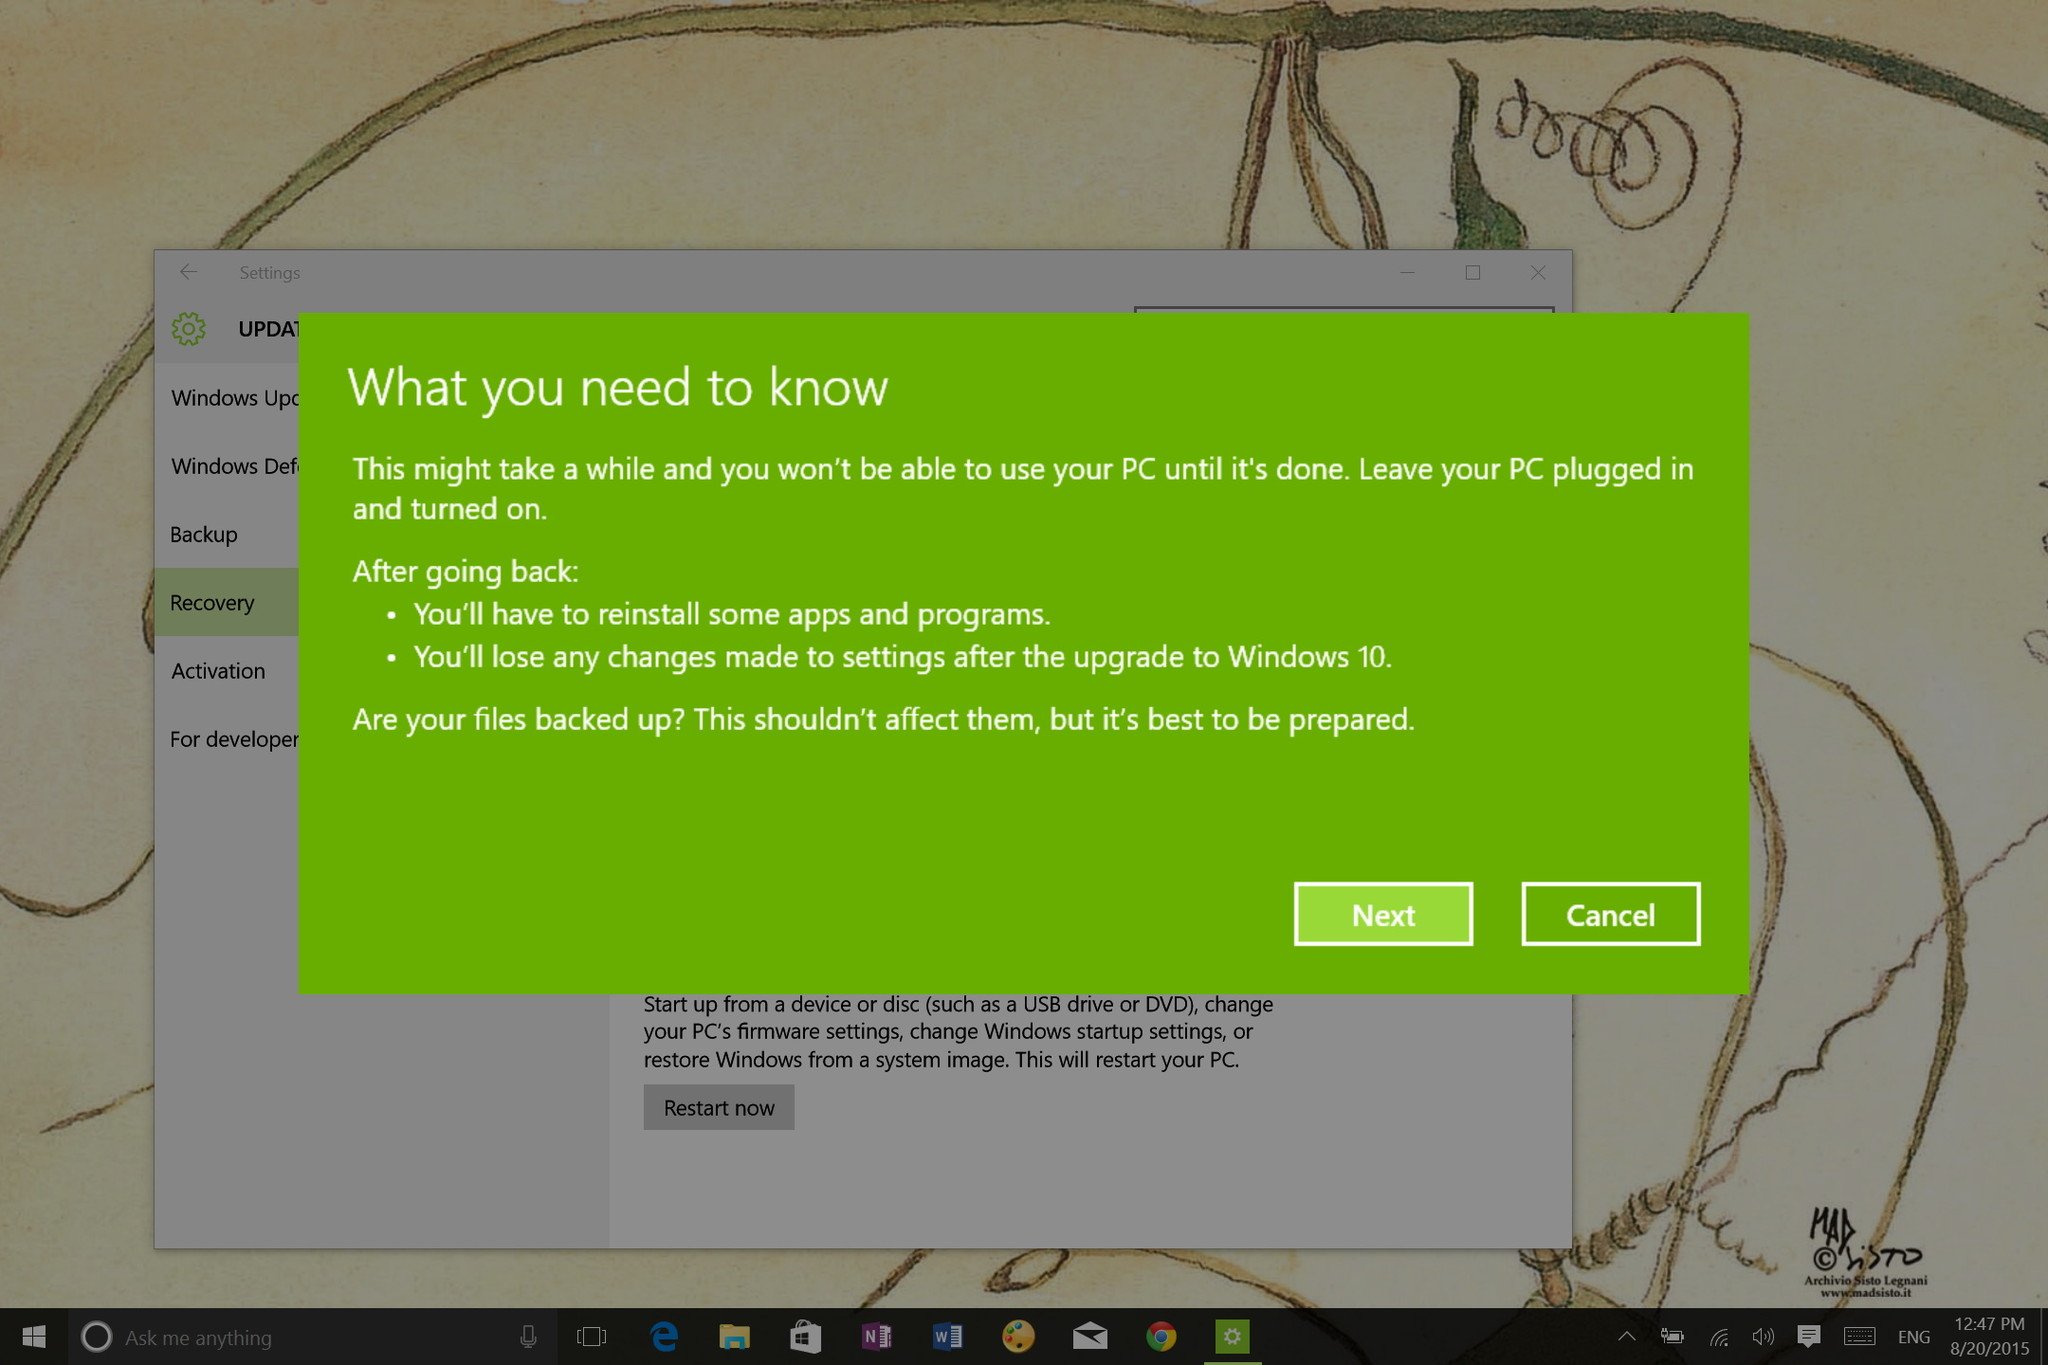
5- You'll get a warning that you'll need to reinstall some apps and programs, and you'll lose any changes made after upgrading to Windows 10. A file backup is not necessary but recommended. And then click Next.
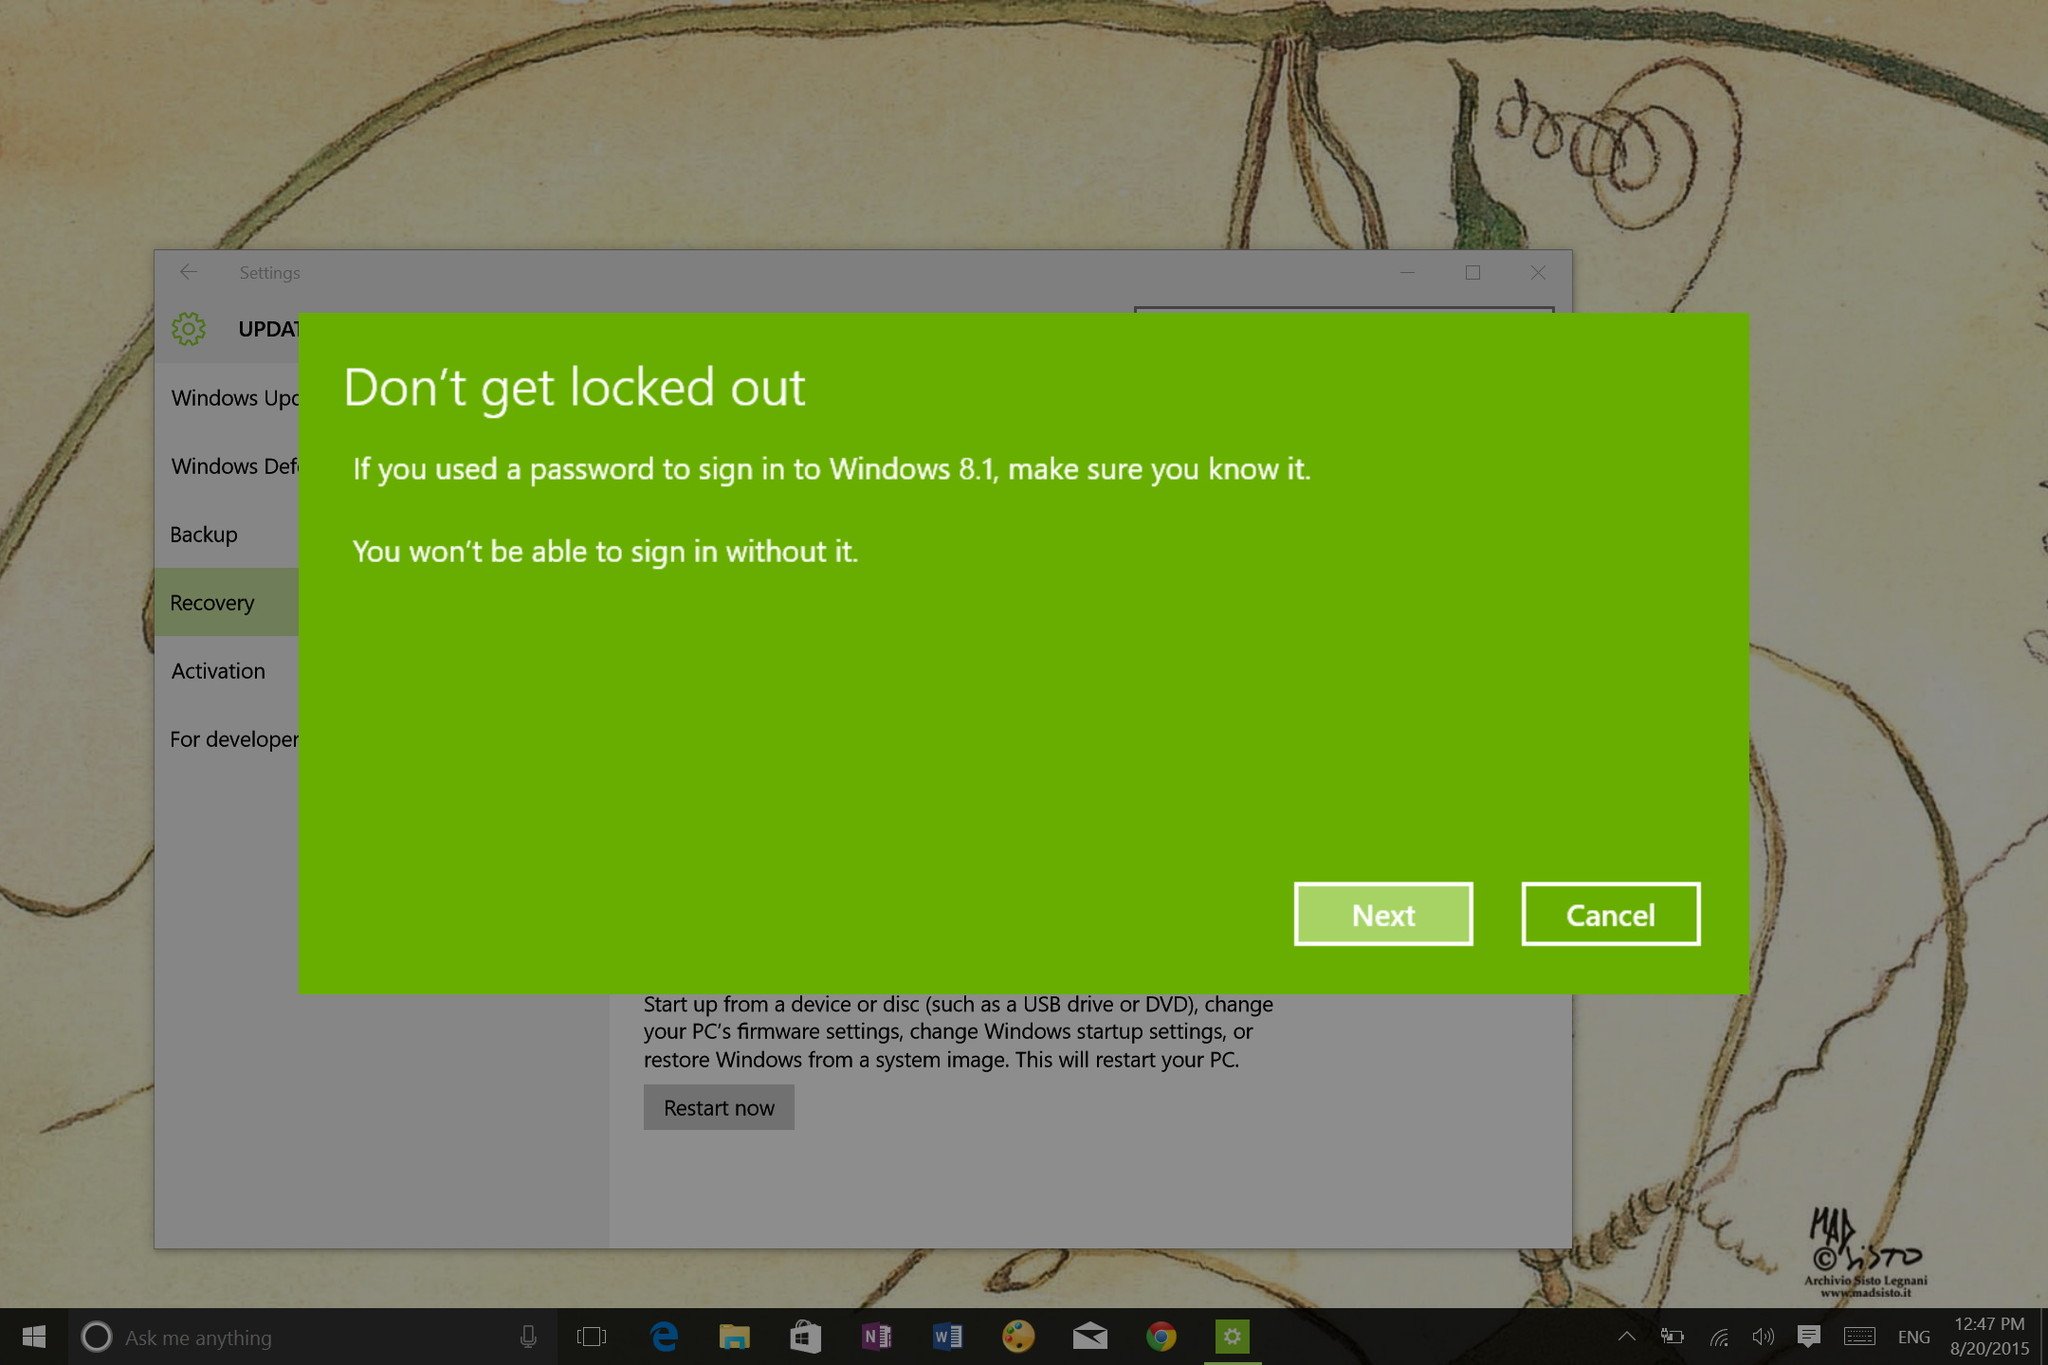
6- Make sure you know your Windows 8.1 password as you'll be locked out of the system without it, and then click Next.
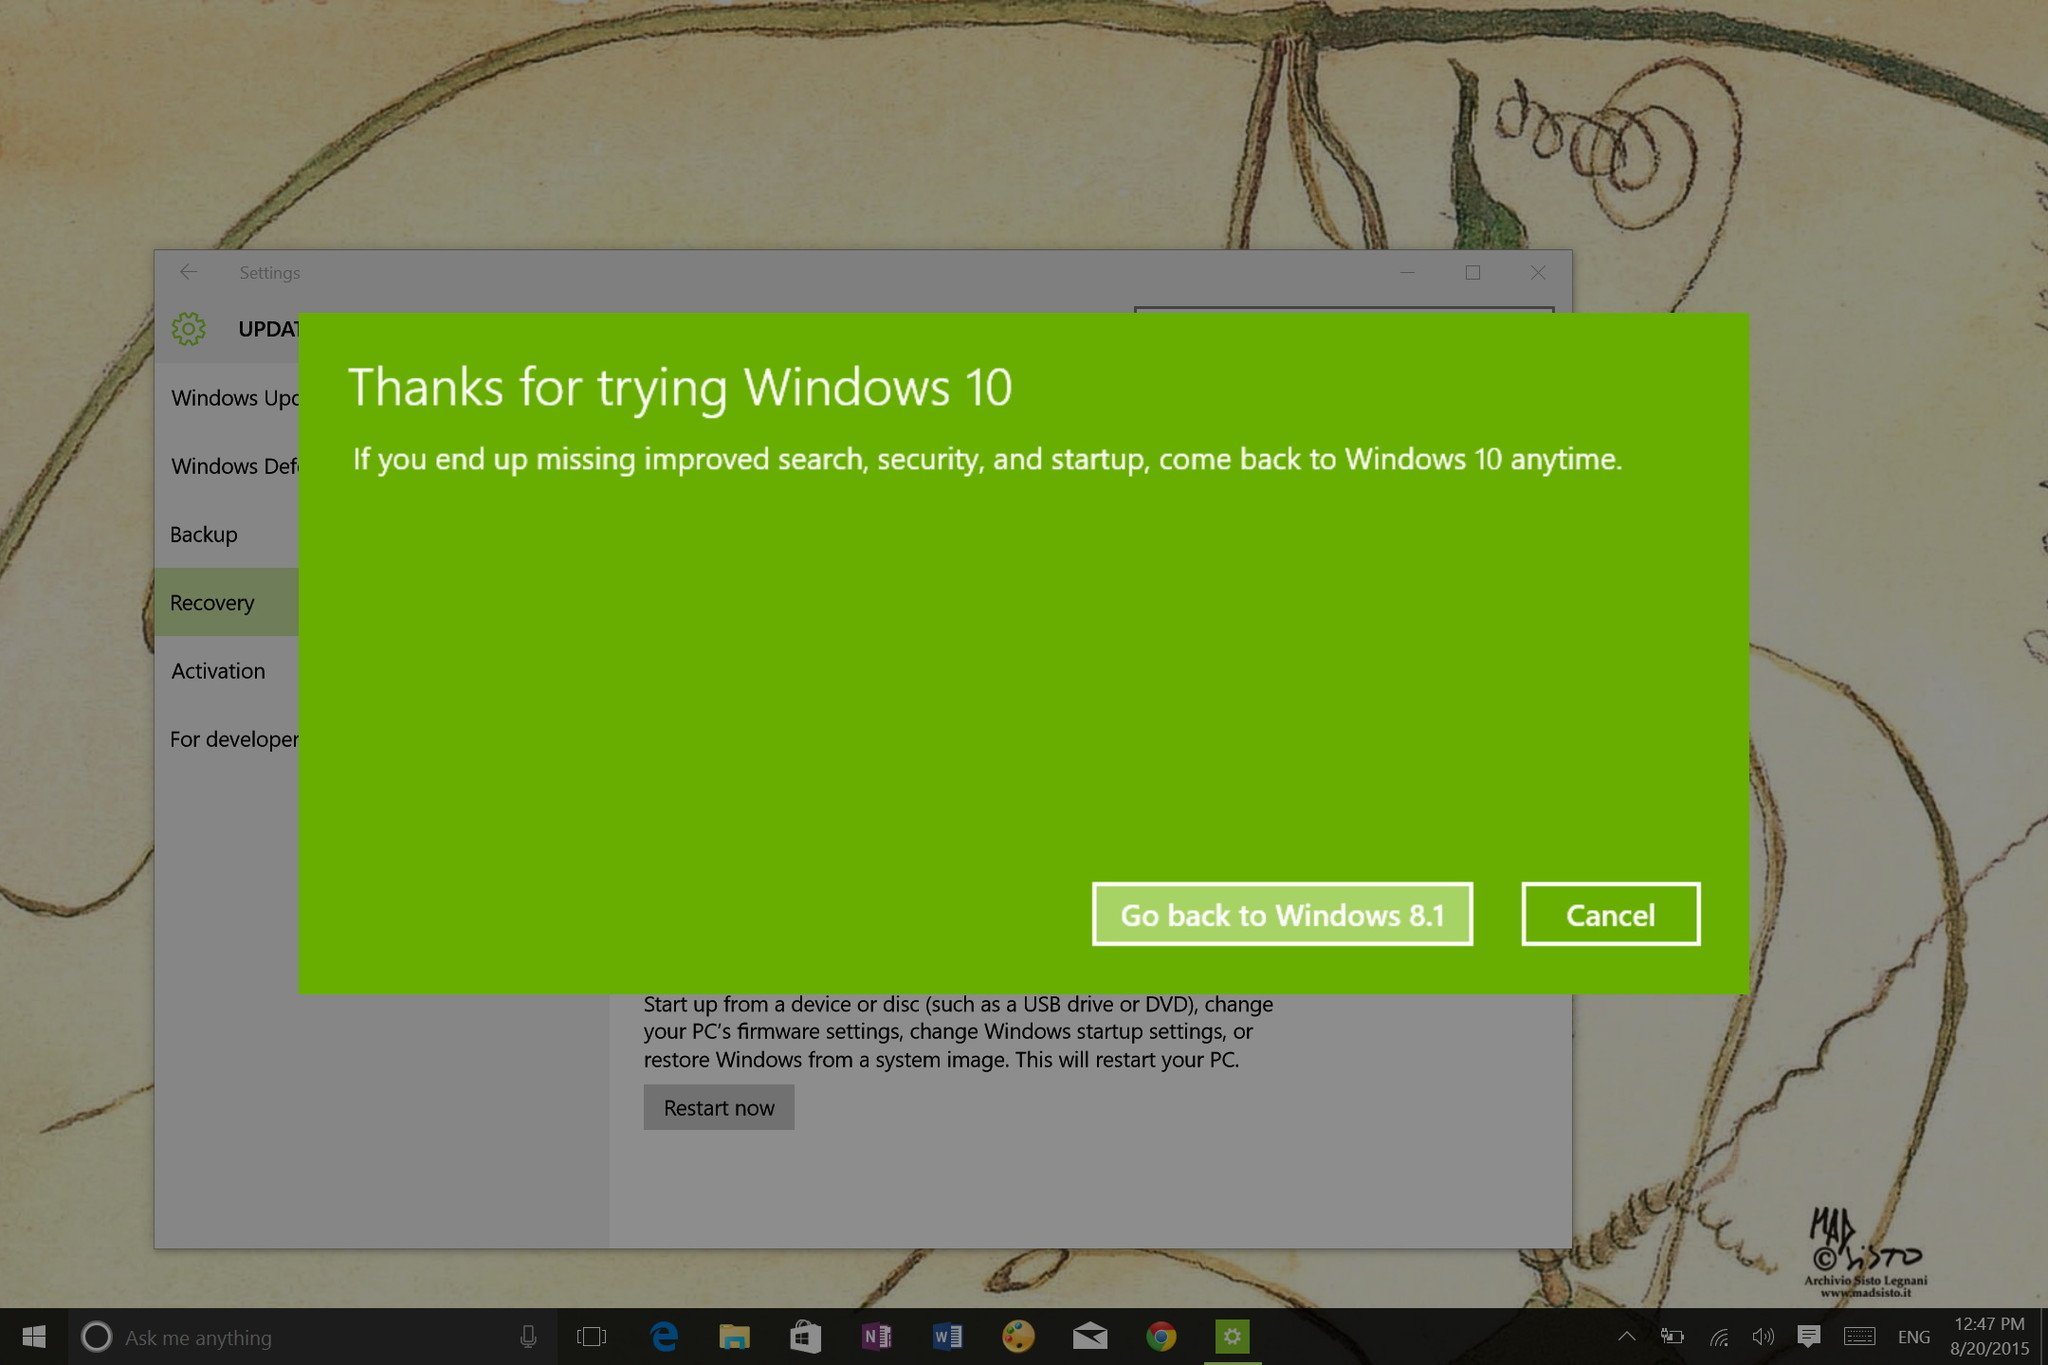
7- Finally, click the Go back to Windows 8.1 and let the process complete.
The process will take some time depending on your system configuration. Once you're back on Windows 8.1, don't forget to check all your apps are installed correctly and check for new updates, as, after a few weeks, it's likely to be out-of-date.
That's all!
Source: http://www.windowscentral.com/how-downgrade-windows-10-windows-81

Wednesday, August 31, 2016

Upgrade to Windows 10: FAQ


Is the Windows 10 free upgrade offer still available?
No, the Windows 10 free upgrade offer ended on July 29, 2016.

Windows 10 will continue to be available for purchase, either on a device or as a full version of the software. A discounted "upgrade" version of Windows 10 will not be for sale.

How do I get Windows 10?
Windows 10 will continue to be available for purchase, either on a device or as a full version of the software.

Do I still qualify for the free upgrade offer if I've already downloaded Windows 10 to a USB drive, but haven't yet upgraded my device?
All upgrades must have completed and reached the "Welcome" screen by 11:59 PM UTC-10 (Hawaii) on July 29; this is one worldwide point in time.

Will the media creation tool still be available for customers to download Windows 10 installation media? 
Yes, the media creation tool and Windows 10 installation media (ISO files) are available for customers to install Windows 10. If you’re installing Windows 10 for the first time, you’ll need to enter a valid Windows 10 product key or buy a full version of Windows 10 during setup, for this tool to work. If you’ve previously installed Windows 10 on your device, you should have a digital license and Windows 10 will automatically activate without entering a product key.

How do I reinstall Windows 10 on my PC?
After you upgrade to Windows 10, you can reinstall or do a clean installation on the same device. You won't need a product key to reactivate Windows 10 on the same hardware. For more info on how to create your own Windows 10 installation media, see the Microsoft software download website. 

Will Windows 10 work with the assistive technologies on my device?
We're committed to make sure customers using assistive technologies can upgrade to Windows 10. For more info about the free upgrade offer for customers using assistive technologies, see Accessibility and the Windows 10 free upgrade.

Tuesday, August 30, 2016

How to make a full backup of a Windows 10 or Windows 8.1 PC

What is image backup?

The image backup feature in Windows 8.1 and Windows 10 includes a bit-by-bit copy of the entire system. This backup contains the full installation of the operating system, settings, desktop programs, Windows apps, and all your personal files.

The major benefit of this feature is that it offers a complete restore solution in case of a critical software error or hardware failure.

The downside is that you cannot choose to restore individual files. It's meant to restore everything, bit-by-bit to the same (or replacement) hard drive. (Though, you can easily access the backup files and extract documents, photos, music, and other files, if you need to.)

In addition, if you don't backup regularly and a system failure occurs, you could lose valuable documents, settings and software because you can only restore the data since the last backup.

For these and various other reasons, Microsoft introduced two new reset features in Windows 8 -- and they are still available in Windows 10. Use these features in combination with File History to keep an up to date copy of all of your documents offered a more robust backup solution.

Despite some drawbacks, it's a solid backup solution.

The following instructions are to perform an image backup in Windows 10, but these steps work perfectly in Windows 8.1 as well.


1- Right-click the Start button and launch Control Panel.

2- Click File History.

3- While in File History, click the System Image Backup link in the bottom-left corner of the screen.

4- Connect an external USB hard drive with enough free space.

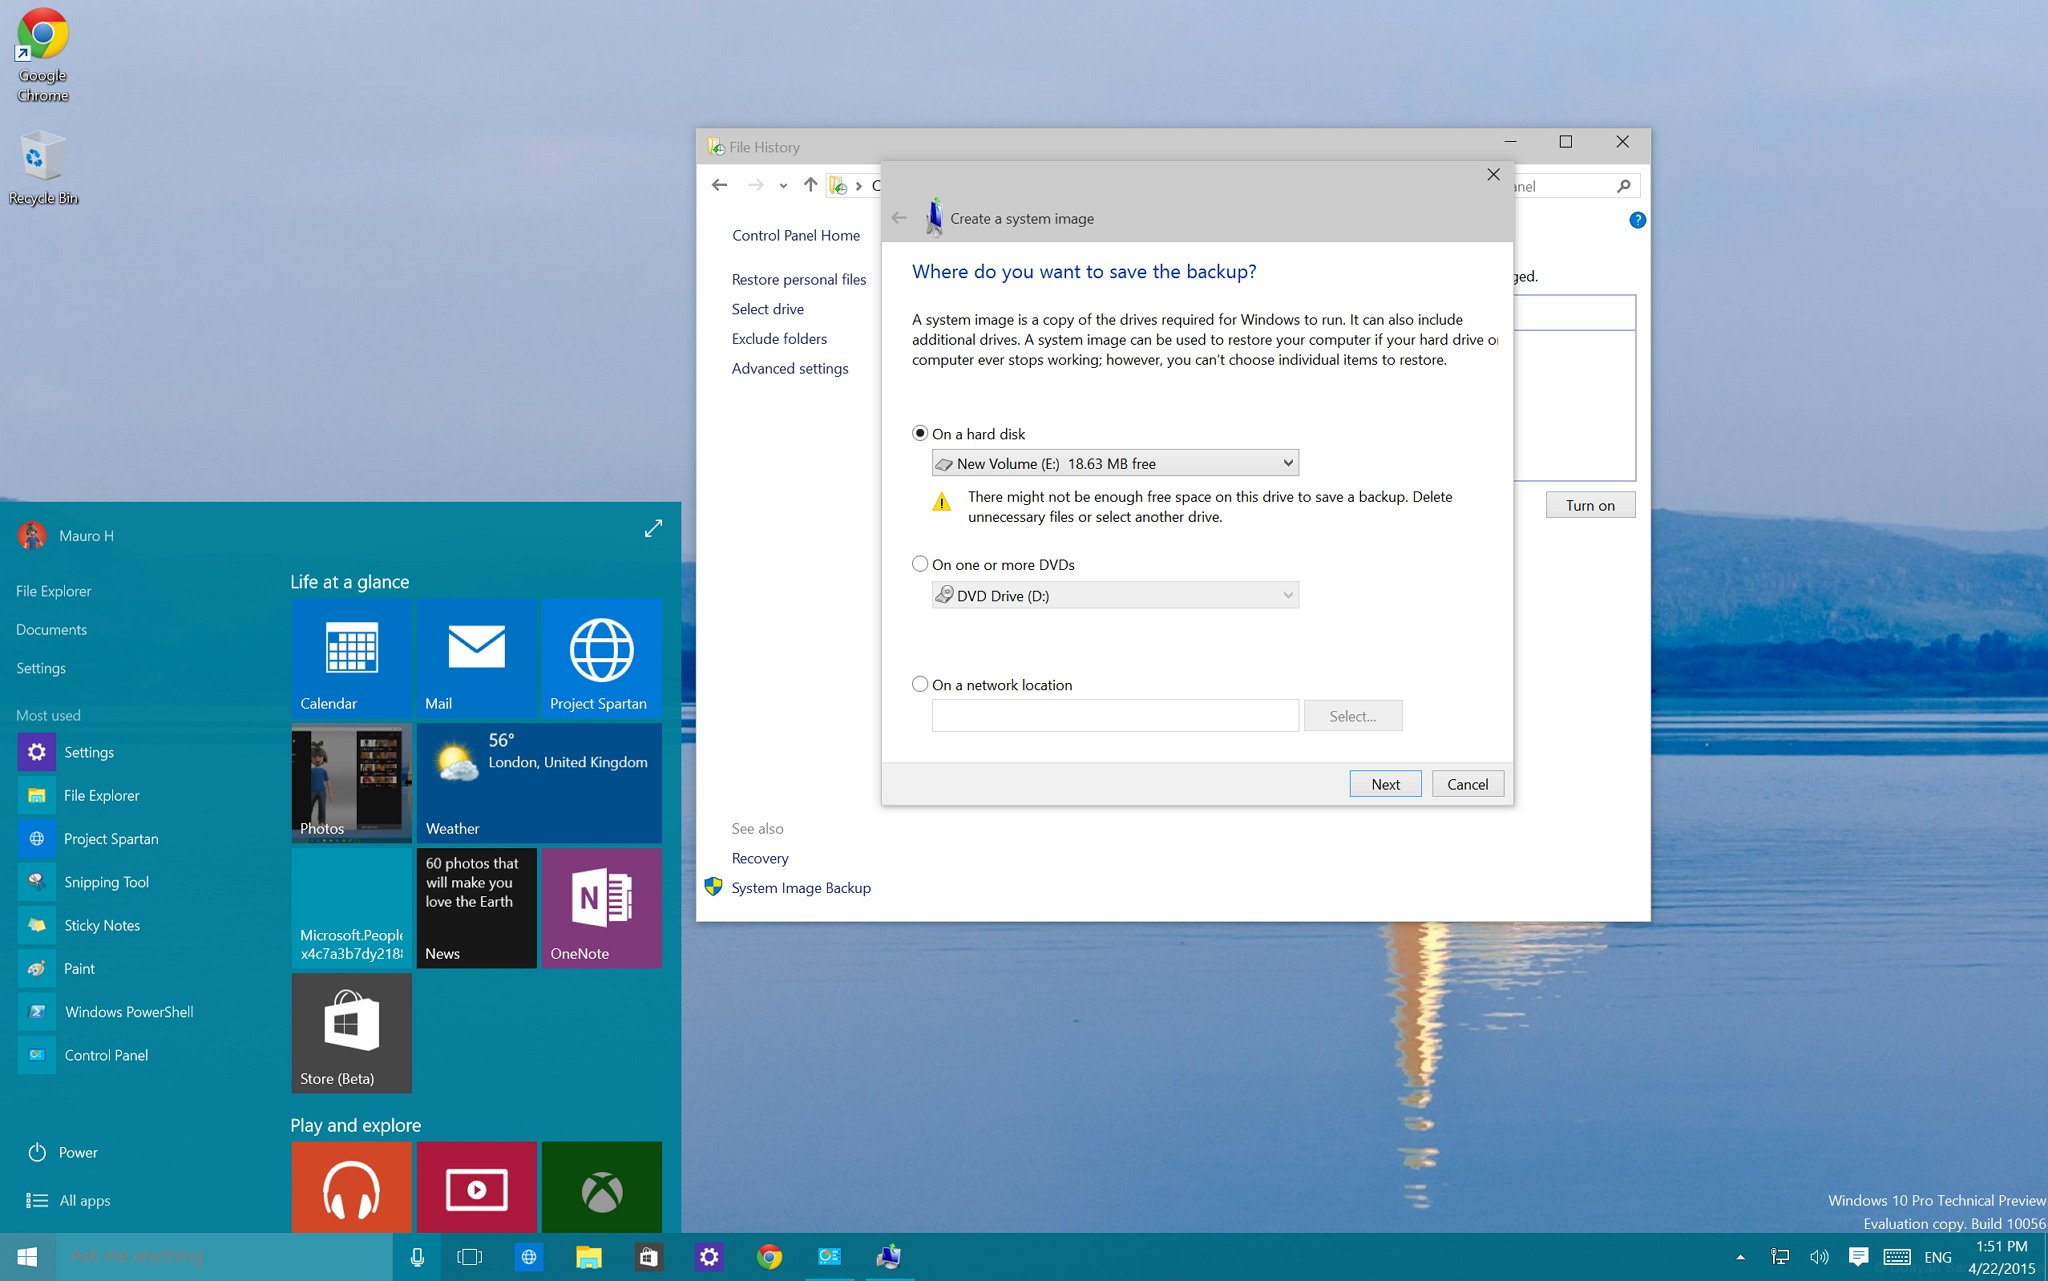
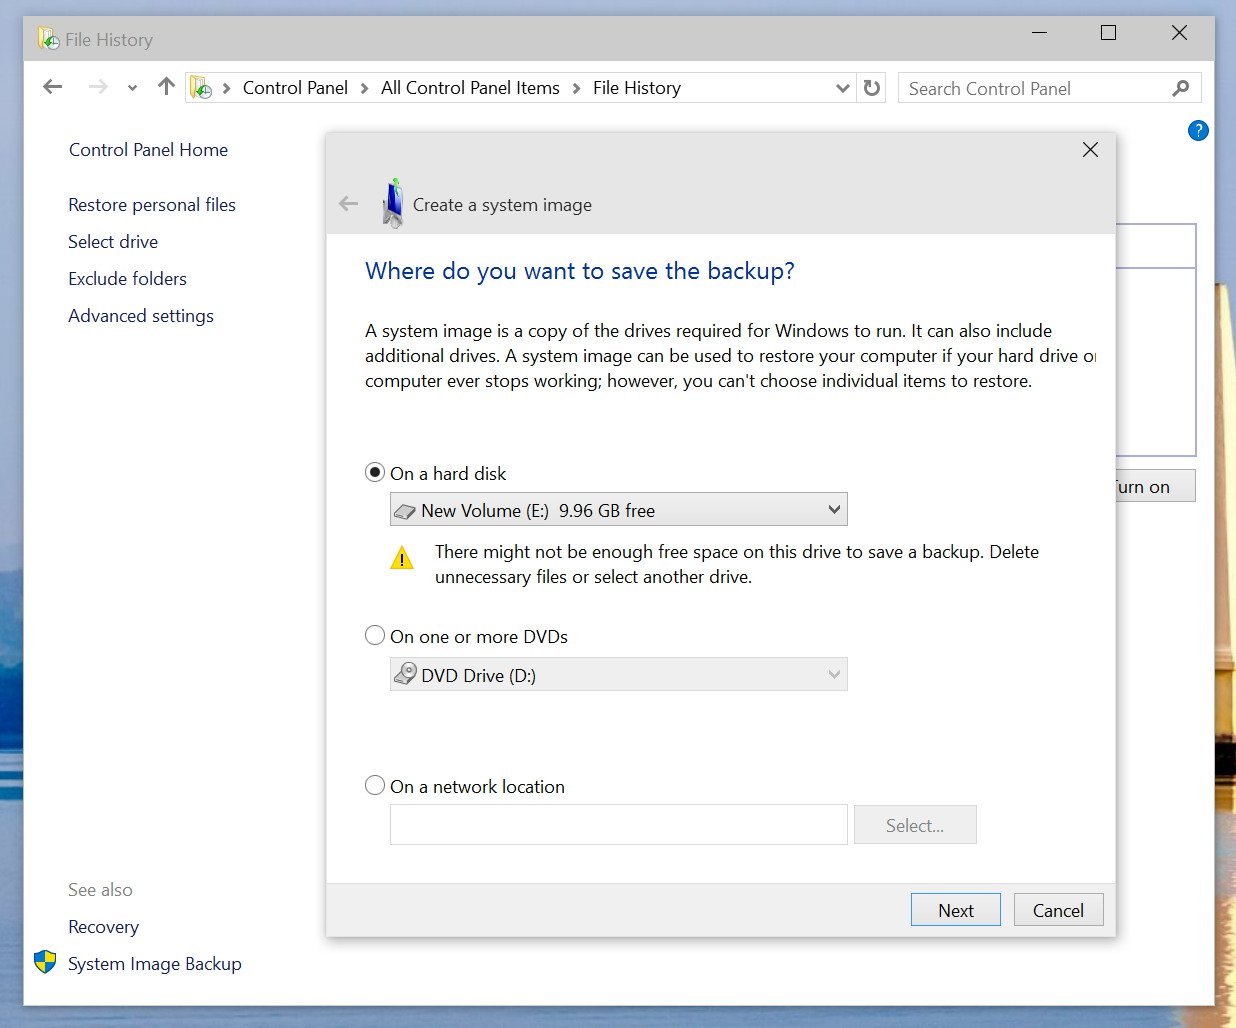
5- In the backup wizard, you'll be prompted to choose from one of the three options to save the backup. For this example, we are going select the hard drive you just connected. However, keep in mind that you can backup to DVD blanks and a network share, but these options will slow down the backup process.
6- Click Next.

7- Confirm and begin the process by clicking Start backup.

The backup could take anywhere from 10 minutes to 2 hours, it all depends on the amount of data to be backed up.

And yes, during the backup process, you can use your computer as you would normally do.

After the System Image Backup utility completes the task, remember to keep the hard drive in a safe place.

Although, a lot of tech savvy users are aware of how to perform a full backup in Windows, you'll be surprised how many people fail to know the basics. Often times I get asked questions such as: "I upgraded my system and now Windows won't boot, how can I rollback?". Or "My hard drive is ruined, is there any way to recover my data?", and most of the times a simple backup could have saved them a lot of troubles.

How often do you do a full backup of your computer? What software do you use? Let us know your backup experience in the comments below!

Update: To restore your computer from backup, connect the drive with the system image backup and reboot your computer with the Windows installation media. During the Windows Setup, clickNext, then click the Repair your computer link in the bottom-left corner of the screen. Click onTroubleshoot, click Advanced options, and select System Image Recovery. Now select the target operating system you want to recover, click Next and Finish

Saturday, August 20, 2016

Windows 10 firewall notification

Problem:
There doesn't seem to be a way of turning off notifications for Windows Firewall.
The usual place "Change Notification settings" in the Windows Firewall Control panel item takes me to the "Turn Windows Firewall on or off".  Is there somewhere else I should be looking?
Solution:
1.  Click the Start button, type Security & Maintenance and then click on the Security & Maintenance control panel option.  You can also go directly to the control panel and get there that way.
2. Choose Change Security and Maintenance settings.
3. Uncheck Network Firewall
This should really be in the new Windows 10 notifications like other notifications but it isn't.  Another option is leave the firewall on and delete all the inbound and outbound rules.  Then add 2 accept everything rules for TCP and UDP to inbound and outbound rules.  4 rules total.

How to Change Windows 10 Desktop Icons

Follow the steps below and check if it helps:
1. Press Windows key to open settings.
2. Click on "personalization".
3. Click on "themes" on the left pane.
4. Click "change desktop icons".
5. You will see a list of system  desktop icons.
6. Click on the icon you would like to change and click "change icon".
7. Click on browse and locate the folder where the preferred .ico files are stored and click "ok".
To change folder icons, you can right click on the folder and select properties>customize>follow the instructions given above.
Hope this helps.

Windows 7 Shortcut Key

Press this key To do this
F1Display Help
Ctrl + C (or Ctrl + Insert)Copy the selected item
Ctrl + XCut the selected item
Ctrl + V (or Shift + Insert)Paste the selected item 
Ctrl + ZUndo an action
Ctrl + YRedo an action
Delete (or Ctrl + D)Delete the selected item and move it to the Recycle Bin
Shift + DeleteDelete the selected item without moving it to the Recycle Bin first
F2Rename the selected item
Ctrl + Right ArrowMove the cursor to the beginning of the next word 
Ctrl + Left ArrowMove the cursor to the beginning of the previous word
Ctrl + Down ArrowMove the cursor to the beginning of the next paragraph 
Ctrl + Up ArrowMove the cursor to the beginning of the previous paragraph
Ctrl + Shift with an arrow keySelect a block of text
Shift with any arrow keySelect more than one item in a window or on the desktop, or select text within a document
Ctrl with any arrow key + SpacebarSelect multiple individual items in a window or on the desktop
Ctrl + ASelect all items in a document or window
F3Search for a file or folder 
Alt + EnterDisplay properties for the selected item
Alt + F4Close the active item, or exit the active program
Alt + SpacebarOpen the shortcut menu for the active window 
Ctrl + F4Close the active document (in programs that allow you to have multiple documents open simultaneously)
Alt + TabSwitch between open items
Ctrl + Alt + TabUse the arrow keys to switch between open items
Ctrl + Mouse scroll wheelChange the size of icons on the desktop
Windows logo key 
Picture of the Windows logo key
 + Tab
Cycle through programs on the taskbar by using Aero Flip 3-D
Ctrl+Windows logo key 
Picture of the Windows logo key
 + Tab
Use the arrow keys to cycle through programs on the taskbar by using Aero Flip 3-D
Alt + EscCycle through items in the order in which they were opened
F6Cycle through screen elements in a window or on the desktop 
F4Display the address bar list in Windows Explorer
Shift + F10Display the shortcut menu for the selected item
Ctrl + EscOpen the Start menu
Alt + underlined letterDisplay the corresponding menu
Alt + underlined letterPerform the menu command (or other underlined command)
F10Activate the menu bar in the active program
Right ArrowOpen the next menu to the right, or open a submenu
Left ArrowOpen the next menu to the left, or close a submenu
F5 (or Ctrl + R)Refresh the active window
Alt + Up ArrowView the folder one level up in Windows Explorer
EscCancel the current task
Ctrl + Shift + EscOpen Task Manager
Shift when you insert a CDPrevent the CD from automatically playing
Left Alt + ShiftSwitch the input language when multiple input languages are enabled
Ctrl+ShiftSwitch the keyboard layout when multiple keyboard layouts are enabled
Right or Left Ctrl + ShiftChange the reading direction of text in right-to-left reading languages

Dialog box keyboard shortcuts

The following table contains keyboard shortcuts for use in dialog boxes.
Press this keyTo do this
Ctrl + TabMove forward through tabs
Ctrl + Shift + TabMove back through tabs
TabMove forward through options
Shift + TabMove back through options
Alt + underlined letterPerform the command (or select the option) that goes with that letter
EnterReplaces clicking the mouse for many selected commands
SpacebarSelect or clear the check box if the active option is a check box
Arrow keysSelect a button if the active option is a group of option buttons
F1Display Help
F4Display the items in the active list
BackspaceOpen a folder one level up if a folder is selected in the Save As or Open dialog box

Windows logo key keyboard shortcuts

The following table contains keyboard shortcuts that use the Windows logo key
Picture of the Windows logo key

Press this keyTo do this
Windows logo key 
Picture of the Windows logo key
Open or close the Start menu.
Windows logo key 
Picture of the Windows logo key
 + Pause
Display the System Properties dialog box.
Windows logo key 
Picture of the Windows logo key
 + D
Display the desktop.
Windows logo key 
Picture of the Windows logo key
 + M
Minimize all windows. 
Windows logo key 
Picture of the Windows logo key
 + Shift + M
Restore minimized windows to the desktop.
Windows logo key 
Picture of the Windows logo key
 + E
Open Computer.
Windows logo key 
Picture of the Windows logo key
 + F
Search for computers (if you're on a network).
Windows logo key 
Picture of the Windows logo key
 + L
Lock your computer or switch users.
Windows logo key 
Picture of the Windows logo key
 + R
Open the Run dialog box.
Windows logo key 
Picture of the Windows logo key
 + T
Cycle through programs on the taskbar.
Windows logo key 
Picture of the Windows logo key
 + number
Start the program pinned to the taskbar in the position indicated by the number. If the program is already running, switch to that program. 
Shift+Windows logo key 
Picture of the Windows logo key
 + number
Start a new instance of the program pinned to the taskbar in the position indicated by the number.
Ctrl+Windows logo key 
Picture of the Windows logo key
 + number
Switch to the last active window of the program pinned to the taskbar in the position indicated by the number.
Alt+Windows logo key 
Picture of the Windows logo key
 + number
Open the Jump List for the program pinned to the taskbar in the position indicated by the number.
Windows logo key 
Picture of the Windows logo key
 + Tab
Cycle through programs on the taskbar by using Aero Flip 3-D.
Ctrl+Windows logo key 
Picture of the Windows logo key
 + Tab
Use the arrow keys to cycle through programs on the taskbar by using Aero Flip 3-D.
Ctrl+Windows logo key 
Picture of the Windows logo key
 + B
Switch to the program that displayed a message in the notification area.
Windows logo key 
Picture of the Windows logo key
 + Spacebar
Preview the desktop.
Windows logo key 
Picture of the Windows logo key
 + Up Arrow
Maximize the window.
Windows logo key 
Picture of the Windows logo key
 + Left Arrow
Maximize the window to the left side of the screen.
Windows logo key 
Picture of the Windows logo key
 + Right Arrow
Maximize the window to the right side of the screen.
Windows logo key 
Picture of the Windows logo key
 + Down Arrow
Minimize the window.
Windows logo key 
Picture of the Windows logo key
 + Home
Minimize all but the active window.
Windows logo key 
Picture of the Windows logo key
 + Shift + Up Arrow
Stretch the window to the top and bottom of the screen.
Windows logo key 
Picture of the Windows logo key
 + Shift + Left Arrow or Right Arrow
Move a window from one monitor to another.
Windows logo key 
Picture of the Windows logo key
 + P
Choose a presentation display mode.
Windows logo key 
Picture of the Windows logo key
 + G
Cycle through gadgets.
Windows logo key 
Picture of the Windows logo key
 + U
Open Ease of Access Center.
Windows logo key 
Picture of the Windows logo key
 + X
Open Windows Mobility Center.


Windows Explorer keyboard shortcuts

Press this keyTo do this 
Ctrl + NOpen a new window
Ctrl + WClose the current window
Ctrl + Shift + NCreate a new folder 
EndDisplay the bottom of the active window 
HomeDisplay the top of the active window
F11Maximize or minimize the active window
Ctrl + Period (.)Rotate a picture clockwise
Ctrl + Comma (,)Rotate a picture counter-clockwise 
Num Lock + Asterisk (*) on numeric keypadDisplay all subfolders under the selected folder
Num Lock + Plus Sign (+) on numeric keypadDisplay the contents of the selected folder
Num Lock + Minus Sign (-) on numeric keypadCollapse the selected folder
Left ArrowCollapse the current selection (if it's expanded), or select the parent folder 
Alt + EnterOpen the Properties dialog box for the selected item
Alt + PDisplay the preview pane
Alt + Left ArrowView the previous folder
BackspaceView the previous folder
Right ArrowDisplay the current selection (if it's collapsed), or select the first subfolder 
Alt + Right ArrowView the next folder 
Alt + Up ArrowView the parent folder 
Ctrl + Shift + EDisplay all folders above the selected folder
Ctrl + Mouse scroll wheelChange the size and appearance of file and folder icons 
Alt + DSelect the address bar
 Ctrl + E Select the search box
 Ctrl + F Select the search box


Taskbar keyboard shortcuts

The following table contains keyboard shortcuts for working with items on the desktop taskbar.
Press this keyTo do this
Shift + click a taskbar buttonOpen a program or quickly open another instance of a program
Ctrl + Shift + click a taskbar buttonOpen a program as an administrator
Shift + right-click a taskbar buttonShow the window menu for the program
Shift + right-click a grouped taskbar buttonShow the window menu for the group
Ctrl + click a grouped taskbar buttonCycle through the windows of the group
Source: Microsoft.com